Wednesday, April 6, 2016

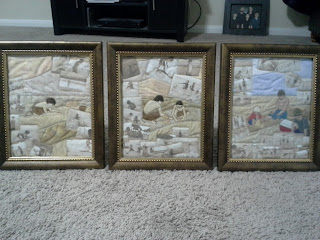
Sands of Time: Mini Portrait Quilts

My most recent project was inspired by the HMQS theme for this year, "It's Magic! Memorable Moments."  I really wanted to enter a quilt into this show...it's an unjuried show, but is a judged show, so every quilt entered (so long as it follows the rules) is accepted, and then judged, which means you get valuable feedback for your work.

I thought. I pondered. I considered. I let the idea of "memorable moments" rattle and roll around in my head, until an idea began to take shape. I let it sit and grow, steadily working on other projects in the meantime. I worked on my son's graduation quilt, I did the baby quilt commission, I was even thinking about this back when I was doing a family tree memory quilt for my aunt. And as I worked on these other things, all the time the idea was forging itself into a mini quilt triptych that I couldn't leave undone.

Memorable moments. First steps. First words. First time at the beach. Beach trips. Sandcastles. Each of my boys, on the beach, building sandcastles. Each of my boys, at around age 10, on the beach. Alone. With his brothers. Layers and layers, trip after trip after trip, a little boy at age three....age five...age eight...ten...twelve...fifteen...eighteen.....at the beach. Alone. With his little brother. With his big brother. With both brothers. Oldest. Youngest. Middle. All the images, all the beach trips over all the years......three mini portraits. The idea became an image which became a quilt. Three mini quilts, part of one triptych that tells one story.

I began by piecing the backgrounds, using improvisational curved piecing to create a gentle sepia toned landscape, sand and sky, for the first two sections and realistic colors for the third panel. The first two symbolize the past, while the final panel symbolizes present day. Where the sand meets the sky I used a straight line, reflective of the horizon line, to give definition since the first two panels don't have the color separation to identify which is which.


I then sorted photos and created a photo collage of each boy. My first thought was to use a photo as the background, and do the applique over it in translucent fabrics. I quickly realized that would be too distracting, so instead chose one photo to create in applique, and keep the frame of photos layered around the edges.


I built the applique pieces by printing the desired photo on cardstock and cutting out the image, then tracing around it on fabric. I began with the full outline of the boy, then cut away one section at a time to define the arms, legs, feet, head, hair, clothing, etc. I then used those same pieces to cut out the hair & clothing and applique those onto the outline of the boy before finally appliqueing the boy onto the background.

Because the final piece is only 8"x10", the image section is only printed at a 5x7 size, and thus the boy in each is only perhaps 5" tall at best. Cutting the applique pieces was by far the most painstaking portion of each panel, though the actual applique process was not bad at all -- I used a fabric glue stick to glue the pieces in place, and then did simple raw edge machine applique, with  my walking foot, using a gold Sulky thread.


Finally, I cut the photos for the framing portion. I cut apart the collages and tweaked the placement so that they were far enough in from the edge that they wouldn't be lost in the actual frame, and yet far enough apart as to give the right effect to the center applique. I wanted to create the idea of the applique portrait being a larger photo in a pile of small photos....a single moment, captured, reflected on, viewed through the lens of time.

The first panel includes only photos of my oldest son, the second has my second son with my first son, and the final has all three boys. I chose not to include photos of my middle son with my youngest son, in the middle frame, as I wanted to tell the story of one boy growing older, and I didn't want to introduce the third son until his panel. The final panel, though, does include photos of my youngest son by himself, with just my middle son with him, and with all three boys together, because in that panel I did want to show the dual roles of my middle son as both an older brother and a younger brother; on his panel, I wanted the focus on him as the younger brother.

In the end, I realized I'd made this for me, not for the show after all. I wanted it framed, not bound, for one. Then, I wanted it as three pieces, and the rules of the show state that a triptych must represent one final cohesive quilt. While I think it represents one cohesive idea, I don't think it truly represents a single cohesive quilt in the way the show directors mean. And, the pieces are too small to submit individually. Which is all quite fine with me, because any feedback would, for this particular quilt, be irrelevant to me. The idea, the feel of it, the emotion of it....I think I've captured those things exactly as I intended. The quilting of it could be improved, but I wanted simplicity for this and so didn't try and dress it up with extra quilting. It is, for me, perfect, and so the perfect place for it is here, at home, where it belongs.


Monday, April 4, 2016

Re Introducing Myself, and What I've Been Up To....

Hi! If you've just found me, welcome! It's been a very long while since I've blogged here or anywhere, and I am determined to make quilt blogging a part of my day-to-day life again. I'm busier than ever, and sewing more than ever, and itching to talk about it somewhere....!

My last post was nearly a year ago, which is scary and sad. I've done a lot since then! The projects mentioned in that last post are further along (some still in the UFO stage, unfortunately....), other projects were started and finished in between then and now, and still more are waiting in the wings to be finished, or even started.

I'll likely go back and fill in with posts, back-dated to when they were appropriate, but for now....well, Now.

I've just had my very first Commission, my very first quilt done for a customer, for pay. Exciting and nerve-wracking!  I've done one other quilt that was requested by someone outside my immediate family, and was given a lovely gift for doing so, but it was not strictly for pay. This one was different, and a friend messaged me to ask "Do you make baby quilts?"

The finished quilt, per the customer's design


Well, of course I make baby quilts. Would I sell one......? Oye. Nerve-wracking. So many thoughts -- I've researched how to properly price my quilts, so that I'm not giving away my time and effort, so I had that more or less figured out. Would my friend run in horror at the price? Would my quilting be worth that price?? Did I want the stress of living up to "for pay" standards??

top corner detail
I'm not a precision piecer or quilter. My ideas and thoughts and attempts often outpace my skills. On quilts I make for myself, to be thrown on a couch and sat on, crumpled up, spilled on, left on the floor for the dog to sleep on.....quilts I make to be used, worn, loved.....imperfections do not matter as long as the quilt holds together in the wash.

bottom corner detail, hearts in the border corner

On gifts, likewise made to be used, I do try harder to be more precise, but still I know that it's a gift, and no one is going to say "oh, the horrors! this line is not 100% straight!!"

outline quilting around the butterflies

But for pay.....to charge someone what my time is worth, there is pressure there, to deliver a product that reflects a worthiness of such a price tag. Gulp. Am I really ready for that?

close up of border heart detail
free motion quilting, no marking, domestic machine

I decided, yes. I could do it. I stressed and sweated and loved every minute of it, until time to deliver the finished quilt, when I mostly just stressed and sweated. Would she like it? Would every tiny imperfection leap out at her, as they do to me? Would she recoil in horror, appalled that I charged her *that*, for *this*?!
baby's last initial (first name is a secret), fused applique with blanket stitch
outline quilting around the C
free motion (unmarked) hearts in the corners

She didn't. I knew she wouldn't, though my mind tried to doubt. Relief, and then joy....pure, excited, amazed, joy. She loved it! I just sold my first quilt!!!! For a real, honest, not giving it away price!!!

It was a fun detour from my current big project, a graduation quilt for my oldest son. Then I did a mini wall-hanging triptych this weekend, just for me. Today is my busiest "out of the house" day, and tomorrow.....back to the graduation quilt. With only 5 weeks until graduation, and currently the quilt is just a stack of blocks yet to be assembled into rows, and pieced borders not even cut yet.....gulp. Lots to do. Starting tomorrow.

Today, basking in the still glowing glory of selling my first quilt.

Wednesday, July 22, 2015

I really have been sewing.....

This summer is flying by! I've been busy working on projects, but not busy posting about them....time to catch up some!

Since finishing the EQ7 Scrap Challenge Quilt (which didn't win, but does look great in my game room!), I have:


*finished binding a table runner that is a gift for my sister
*finished quilting 12 round placemats for my table
*created my first ever continuous bias binding
*attached said binding to the front sides of 6 round placemats
*took advantage of 4th of July sales and bought 30 fat quarters for the price of 20
*made 5 Halloween themed blocks that will become a Halloween table runner
*cut all the pieces for a pattern I bought several years ago
*started piecing the blocks for that same pattern; 13 down, 35 to go....

The table runner for my sister, and the current project, are the only two using purchased patterns; the placemats & Halloween table runner are my design. And this current project actually is adapted by me, and some of the pattern blocks are traded out (or will be traded out) for traditional blocks, from my EQ7 library. And of course is done in my colors, not the published colors.....it makes me twitch to do things that everyone else is doing.

So, pictures of all of that coming soon. For now, the table runner...

from the Cherry Blossoms Bon Appetit Pattern
http://shop.cherryblossomsquilting.com/Bon-Appetit-107.htm

This was a pattern, Bon Appetit by Cherry Blossoms, that I purchased at IQF 2014, in Houston. The pattern came with full-sized and miniature templates and super easy to follow directions. 

I, of course, put my own spin on it --- I used different borders than those in the pattern, and turned the spoon upside down to lie more neatly alongside the fork. I used colors that coordinate with my dishes, thinking I would keep this for myself as an everyday table runner on my dining table; I plan to make seasonal runners as well. 

Once I finished the table runner, though, I felt it did not coordinate well enough with the regular day-to-day decor in my dining room, which is very distinctly beach themed (even though it does coordinate perfectly with my dishes, which are Fiestaware in all the colors). 

I debated hanging this in my kitchen, instead, but my sister commented that she loves it, and it was easy to choose to give it to her instead. She has different colored chairs, and so this will coordinate well in her dining room/kitchen as well. 

I did the binding in purple, the one color not used in the main quilt top, because that is a favorite color of hers -- it's the awareness color for Chiari Malformation, which she suffers from. 

I'll put this in the  mail soon, happy that it has found a home where it will be enjoyed. 

Monday, June 1, 2015

Finished! -- EQ7 Scrap Challenge Quilt

Whew! I worked like mad over the weekend and managed to get this quilt finished & submitted by noon on Sunday, 12 whole hours before the expiration/final deadline to submit! Yay!! There weren't many entries, so maybe I have a decent shot at a prize....we shall see. Either way, my game room now has this adorable table topper, and I'm going to move all my fabric mug rugs/coasters down to a napkin older on the bar, so that we can grab one as needed.

The single table topper on the game room table will protect the table better, and make it easier to clear off when the boys want to play a game; just move the one big thing off, play the game, and put the one big thing back when done, versus them scooting the coasters around, tossing them on the floor, etc. It looks so much neater this way; I'm glad this challenge came along, as it's not something I would have thought up on my own, but sure was fun & perfect for that little table.

So...pictures! I didn't take very many progress photos, because I really didn't have time to stop and photograph; I was just sewing like mad.

Once I got the top pieced (finished that on Thursday), I started quilting. I knew right away what I wanted to do in the blue rows, so started there while I pondered what to do in the orange diamonds and the white & gray sections.

For the blue rows, I did closely spaced lines in the light blue ribbons, and then inside outlined (reverse echo) the dark blue & black arrows. I wanted the arrows to pop, and felt light quilting inside of dense quilting would help accomplish that.

all the blue ribbons are quilted

To simplify things, I did one continuous line, just stopping and pivoting the quilt then going back the other direction. Over and over and over again, inside each section of ribbon. This method took me just at 30 minutes per full blue row (it helps that the whole quilt measures only 30" x 30"). This much turning, though, meant I mainly sewed in one-hour blocks; all of that turning and guiding was rough on my shoulder, so I would sew two rows and take a break, which is why it took me all weekend. Remember, I'm sewing on a small Janome Magnolia 7318, not a long arm or anything like that. 

close up of the quilting so far....

Here's a peak a the game room; we've been in this house for almost a year, and just finally this weekend put together that cute little shelf in the corner; until now, all the games, puzzles, etc, were just stacked in the corners. Very cluttered, very messy, very unappealing. The new clean & organized shelf, and the now uncluttered table (seen below with the topper on it), make me very very happy.

the game room

table topper, on the table

So...what did I decide to do in the other spaces...? In the gray background "diamonds" (that seem to tuck behind the light blue ribbons...), I did the same straight line quilting, following the outside edge, so that the lines in each quadrant are diagonal, thus enhancing the idea of those gray units being a large diamond tucked under the ribbons. 

In the orange diamonds inside the gray I chose to reverse echo each triangle, so there are 4 little triangles quilted into each of these diamonds. The quilting on this part (the gray section & the orange inside each one) took me 20 minutes per section, so another two hours of quilting here....now we're up to 4.5 hours total quilting time. 

The remaining parts went faster. On the orange diamonds in the white, I wanted to reverse things; I didn't want dense quilting next to dense quilting; I wanted the white to stand out from the gray. So, I chose to outline the white, following the same lines as I had in the gray, but with only one line reverse echoed inside each white section. Then, to differentiate the orange diamonds in those rows, I did a concentric square/spiral square inside each one, starting in the center and following the lines of the shape of the diamond/square. This part also took me about 20 minutes per vertical row, due to all the turning inside those orange diamonds. 

"Your Turn" 30" x 30" scrappy table topper
Quilt stats: 5 white fabrics, 7 light blue fabrics, 2 black fabrics, 3 gray fabrics & 6 orange fabrics used
only 1 dark blue fabric, and a single fabric for the binding
Entered in Electric Quilt Company's Spring Fling Scrap Challenge
machine pieced & quilted on Janome Magnolia domestic machine

To finish up I did the very edges; I quilted each edge piece as though it were a cut-off middle piece. Then I trimmed the quilt, sewed my binding together & sewed it on; machine sewn to the front, folded over and hand sewn onto the back. Finished & uploaded right around noon on Sunday (we were stuck home from church due to some flooding in our area). 

Fingers crossed that my quilt wins a prize, but if not, at least the game room looks great now! 


Wednesday, May 27, 2015

Making Progress! EQ7 Scrap Challenge

While voting is still going on in the Blogger's Quilt Festival (you can still vote for my Oceans of Love quilt, if you haven't yet!), I've been busy trying to finish the EQ7 Spring Cleaning Scrap Challenge quilt.

Funny how the smaller the pieces, the longer it takes to put together!

To start with, I had to decide how to join all those little 2" squares (whether a solid square or a HST/Half Square Triangle unit) into the 4-patches that would then become the rows. I didn't want to just start sewing, so first I laid out all of the individual pieces according to the EQ7 diagram, and played with layout.

Did I want scrappy orange diamonds, or single fabric diamonds, distributed in a scrappy layout? What about the black arrows....? and how to distribute the various blues and such...? I counted how many pieces of each different color, sorted them into piles, then started laying them out in rows, making swaps and decisions as I went.


I decided on single-fabric orange diamonds, and let the blacks be mixed up; the rest didn't bother me (and there is actually only one fabric in the dark blue arrows, so that part was easy). 

Once I got it all laid out, it was time to turn individual pieces into 4-patches, which will then later become rows. I had to make sure the diagonals lined up on each one, which is not my favorite thing -- I'm more of a "good enough" quilt maker than a "precision is everything" quilt maker. When I get one just right, I get a little bit giddy and stop to take a picture.... ;) 


I'm still in that phase of construction right now....slow going! It took me a few rows to figure out a way to chain piece the 4-patches without mixing them up and getting things put together wrong; if I flip the top patch down onto the bottom one, and stack those, then carry them to the sewing machine *just.like.that.*, then they are  oriented the right way for me to just take the top one and sew along the right-hand edge (which is the seam between top & bottom). 

Then I just have to keep them in order as I unfold them, finger press that seam, and sew into 4-patches. To help with this, I keep them stacked and only unfold one pair at a time, sew that one, then unfold the next one. 


It takes me roughly 20 minutes per row, so if I actually work on this today I should be able to finish. Then assembling the rows ought to go quickly, and then rows into a top just as fast. If I can get the top totally assembled today, that leaves me.....four whole days to get it layered, quilted, and binding on in time to submit. Egads.

Hope I can make it!

Friday, May 22, 2015

BQF: Voting now open!

Voting is now underway at Amy's Blogger's Quilt Festival! I'd love if anyone wants to go vote for "Oceans of Love" in the Small Quilt Category, and then be sure to explore the other categories and vote for any other favorites!


BQF: Small Quilt Category

Wednesday, May 20, 2015

Sneak Peek: EQ7 Spring Cleaning Scrap Challenge

One of my favorite quilt blogs, "Do You EQ?" (hosted by Electric Quilt publisher/company, the publishers of the EQ7 Software I use in designing my quilts), is hosting a "Sew & Win" scrap quilt challenge. 

The instructions were to download one of three (or all three) patterns, color them in using your EQ7 software, and create the quilt from scrap fabric only.

I downloaded all three patterns, so that I could play around in my EQ7 until I decided on what would work with the scraps I have on hand.

I limited myself to just the bottom drawer of fabric, which is where I toss all my leftovers after any project. Now, most of my fabric in the top drawers (aside from the fat quarters) is also scrap, cut into pre-cut sizes (10" squares, 5" squares, and 2.5" & 1.5" strips), but for the heart of this challenge I wanted to use my actual scraps. Some of those are large pieces (the leftover edges I cut off after I finish quilting, for example), some are tiny bits. All are leftovers, scraps & remnants from other projects.

Here is a peek at what I've got started....the deadline, to be pieced, quilted & binding on, is May 31st. I hope I make it!