Saturday, September 3, 2011

Red White & Blue -- Closing in on Done!!

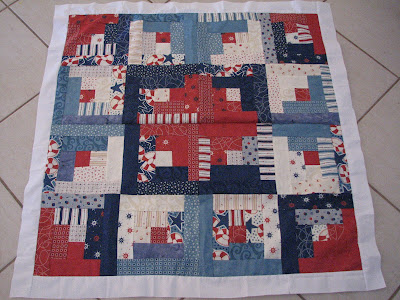
After working on various small projects the past few months, and working diligently on piecing the borders for the red white & blue quilt, I'm finally putting the borders on the quilt top.

Thursday I got the inner border, a plain cream/white strip, put on. I was very impressed with myself for managing to start and end with a quilt that actually measures more or less square, both at the middle and at the edges.


inner border -- at this stage, the quilt measures 40.5" x 40.5"

Yesterday I procrastinated most of the day, scared to take that next step and actually put the pieced border on. It just seemed so......daunting. What if I messed up? What if it was too long? Or not long enough?? So, I stalled. I played on the computer. I did laundry. And dishes. And played on the computer some more. And finally, I sat down and started pinning.

I used lots and lots and lots of pins. To be safe and keep the border absolutely still, I put one pin in every seam in the pieced border. I started pinning in the center and then went left, right, left, right one pin at a time working out from center until I pinned all the way to the edges. Whew.

Finally, when that was done, I marked my quarter-inch line and started to sew. I only got one side done last night (it takes me about an hour to do the 40" length by hand.....) but it looks pretty good. Well, I've not pressed it yet (and didn't press the border strip before I put it on, other than finger pressing the seams.....), so it's kind of wrinkly. But other than that, I think it looks good.


the 1st side of the pieced border
other than the wrinkles, looks pretty good!

This morning I laid out the next side --this border goes on clockwise instead of opposite sides-- just to see how it will look with the blue on as well. I like it.


fuller view of the quilt, with the 1st side of the pieced border (red)
and the 2nd side laid out to preview before being pinned & sewn on
(pretend you don't see the dish towel and other mess on my dining table....)
Since the photo, I've pinned the next side (which is, amazingly, the exact right length....) and am ready to go sew. I still can't believe I'm getting this close to having the top done. Now that it's so close, I just want to finish. Can't wait to see what it looks like when all the sides are on and the top is complete!

Tuesday, August 9, 2011

My Sister's Kindle Cover...

My little sister got her package yesterday (hooray!) and so I can show you the Kindle Cover I made for her.


closed
note the (subtle) detail stitching on the front flap


open
I did a wrap-around binding for this project
the Kindle does fit all the way in, but is shown partway out just for display purposes 
I had so much fun making this -- my new favorite technique is to make stuff with these strips of fabric like this. What you do is to cut a piece of fusible stuff or thin batting and sew two strips at a time (right sides together, laid on top of the batting; sew down the far edge and then fold over the top strip) until you have covered the whole piece of batting. Such a nice, finished, polished look for such little effort!

My mom helped me choose colors, and we more or less matched our choices to the lining fabric. We doubled up on the maroon because my sister is a Texas A&M fan.  We included one strip of burnt orange because others in her family are UT fans ;-)

For a little finishing detail, I outline stitched one flower from the lining so that the quilting stitches showed, subtly, on the front flap. Just to give a little extra.

Here's a link to the Bookkeeper pattern I used*, from Moda Bake Shop. If you craft at all, check out that blog. Tons and tons and tons of tutorials, free to use, and beautifully easy to sort through. It's my new first place to look when I need an idea for a project.

Tomorrow, back to talking about Brazil.....The Chemist and I are trying to get our Brazilian driver's licenses, which is proving to be a multi-day process, just to transfer our US licenses to some kind of valid thing here in Brazil. Today we did several sets of photos, fingerprints and a medical exam; tomorrow a psychological exam and turning in the paperwork......but, that's tomorrow's story.

See you tomorrow afternoon!

*if you try making a bookkeeper, note that I used 10 strips, not 9. Not sure if the problem is my math, my cutting, her math, her cutting, or ??? 

Friday, August 5, 2011

What was in the packages...? Come and see!

The Pay it Forward packages have been received and it is now my pleasure to show you what was inside each one. I'm delighted that the recipients were pleased -- I love giving gifts to people and finding out I chose (or in this case, created) well. Makes my heart sing to give a gift that someone loves getting!

Inside this package....
BoonieSooze's package
....was a set of photo note cards that I made just for Susan!

homemade photo notecards
if memory serves,  I made 10 full color, 10 sepia
I used various photos that I'd taken during the Project 365 I tried to do last year, things I thought would be of general interest. I turned those photos into a collage using Picasa photo editing software, and made one version in color and one in sepia tones. Then I chose card stock papers from my scrapbooking supplies, and light colored papers for the insides and sandwiched everything together into a decorative card.

I made different sizes for different needs that Susan might have. My only regret is that I didn't have envelopes to send along with it; hopefully they are standard enough sized that she can use regular envelopes (sorry, Sooze!).

Inside this package....
June's present
..was a set of wine slippers for June, The Mendon Foodie. She and a group of girl friends get together for wine & food nights, and when I saw this pattern over at The Quilt Show pattern page  I just knew it was  perfect for June. (note: you have to be a member, though basic membership is free, to view the full pattern)

the wine slippers
I took the advice of the pattern and made each one a different combo of fabrics so that they can serve as wine glass identifiers, too; just remember your color combination and never loose your wine glass in a sea of glasses again!

with a wine glass, for sizing and scale
The pattern made zero sense to me when I first read it -- I could not wrap my brain around how it was going to work. Still, I trusted the pattern maker and just did what it told me to, one step at a time, and it worked beautifully! It had seemed way to easy, and it was very easy to do, and made such a lovely finished project. I'm planning on making sets of these for Christmas gifts this year, so if you use stemmed glasses at all and think you might be on my Christmas gift recipient list, speak up!

close up so you can see how the slippers slide onto the base of the wine stem

Oh! and don't you just love the wine glass itself?? That was an unexpected and delightful gift I received this past Christmas, and it is such a treat. I love to pour a glass of grape juice or iced tea during the day and sip from my wine glass.....it feels like a secret indulgence when I drink from this glass, even though it's just iced tea. Some people I know might receive a glass for Christmas, too.....there are all kinds of designs, from 95andSunny, aka Bottoms Up designs. Fun, fun, fun. 

Now I'm waiting on my sister to get her gift, and on camera batteries to charge so I can take a photo of the iPad cover I made for The Chemist. I can't wait to show those to you too! I'm still working on my larger quilt projects (the diary quilt and the red white & blue) but these little things are fun breaks for when I'm bored of one fabric, plus this sort of sewing fills my need for giving gifts and for completing a project.

It's so nice to take a break, spend two days doing something start to finish, wrapping it up and sending it on its way and then get back to the big sewing I have waiting on the side. Love that!

Do you like to give gifts? Have a favorite gift you love to give? Tell me about it! 

Thursday, August 4, 2011

The First Present Made It!!

I'm so happy to share with you one of the presents I sent off. It was the next-to-last present that I made, was not for the pay-it-forward but was just because, and was hard and fun and wonderful.

My mentor, Jules over at And Sew On...., has frequently gone above and beyond in email teaching me how to sew and quilt, and I wanted to finally thank her in some tiny tangible way.

She also recently started a Long Arm Quilting business and has had business cards made to promote that. Alas, she has --had-- nothing to carry her business cards in.

I hopped on-line and searched free patterns until I found the one I wanted -- an Amy Butler Business Card Keeper free pattern.  

I'd seen a picture on Jules' blog, about what her office would look like if she had an office. Modern, black & white with hot pink. Hmmmmm..... I sorted fabrics and found just the right choices in my stash.

Then I got to work...

Open -- the flaps inside hold business cards in place once it is folded closed.
 ....and made that pesky button hole.....

button hole close up

different view
...and did some detail stitching as an accent....

it's a little blurry, but I did black outline stitching around the pink flower on the back of the card holder

...and finally sent this off,

...all wrapped up, so that Jules can showcase her business cards in a nice fabric card holder. She can explain that a long-distance student she's never met made it for her.  That ought to spark some interest....

Have you ever received an unexpected gift? Or sent one? What was it? 

Saturday, July 30, 2011

Presents are on the way....

A while back, my friend Mrs. Wookie over at Mrs. Wookie's Wanderings shared a "Pay it Forward" idea. She'd read it somewhere else, and shared on her blog, and then me on mine, and so forth. The idea was that the first person offered 3 homemade gifts, one each to the first three people to leave her a comment. The understanding was that those three people would turn around and "pay it forward" by offering the same on their own blog, facebook, email, whatever.

Mrs. Wookie accepted the challenge, offered it on her blog, I replied over there and offered it here. I actually had 4 people respond, two of whom have so far sent me contact information, and I'm happy to report that my mom carried off the wrapped presents and is mailing them today, so my recipients should get them in the next week or so. Sooze & June, let me know!

I won't show what I sent, since they've  not received them yet, but here are the wrapped packages, ready to be mailed....

for Sooze, over at Wild Life in the Woods

and for June, formerly of Mendon Foodie but no longer blogging
Wrappings on both are typical Brazilian gift bags.

I also sent off a gift to my little sister, and a gift to my quilting/sewing mentor. Can't show those either, since they've not reached their new owners yet.

Let me just say, though -- I had so much fun thinking of things to delight each and every recipient. Choosing just the right elements to include, thinking over what this person and that person would enjoy, sleuthing out things like favorite colors and such, and then praying for the recipients as I crafted their gifts -- it was so much fun. I'm a gift giver at heart, and my new hobby of crafting things with my hands (although not all the gifts are made of fabric and stitches....) is such a great way to implement that.

I can't wait until everyone gets their gift and I can share with you what I made. I'm working on three more gifts right now, too; one more to be mailed which I'll have to mail from here, and two for local folks. I'm waiting on one more person back home to give me some hint as to what sort of gift she'd like so I can make her something, too (hint, hint Momma 3M if you are reading...). I absolutely love that I can create things for the people dear to me.

I kind of still can't believe that a year and a half ago I was struggling to figure out how on earth to put together a few simple squares and triangles into one little quilt square, and now I've finished the main part of one quilt top, have made "stuff" which I said I'd never do (too hard!), am working on a quilt sure to be an heirloom for my boys one day, and am planning even more. I've got a design rattling around in my head for a Brazil themed quilt, and t-shirt quilts for the boys, and placemats and cloth napkins for our house, and gifts for folks for Christmas, and, and, and....

I never imagined one tiny little project that seemed so hard and confusing such a short time ago would turn into this hobby, passion, addiction, thing. I love having a new hobby that feels productive and not time wasting. I love that when I spend money on myself, buying fabrics, I can turn around and turn it into gifts for other people. I love that I'm busy in an industrious kind of way.

I'm having sew much fun, I just hope I don't bore you with my sew many sewing stories on the blog....

Friday, July 22, 2011

Mom's Purse...

This post could go in many directions, from the literal to the philosophical. Today, I'm sticking with literal, which means -yes- an entire post about a purse.

Before I get to that, though, an update -- The Adventurer is pretty much fully recovered from the incident that sent us to the ER last week. We do have a follow up with his pediatrician, on Monday, but mostly as a formality at this point. Thanks, much, for all the well wishes; they mean a lot. Thanks too for your patience in a mostly dark blog this week while I was busy making sure he got fully recovered. You guys rock. Seriously. 

Not just any purse, though. My mom's purse.

A purse I made her. From a pattern I more or less invented.

It's kind of a pretty awesome sewing Win, if you ask me. 

I started off with a basic free shopping bag or market bag pattern, right up until I realized, "Hello?? She wants a purse. Not a shopping bag. And 16" x 23" is kind of huge for a purse. (smacks forehead and ditches the pattern). Crap. Now what??"

Now what, indeed. Now, "Wing It," that's what. So I did.

I meant to take pictures all along the way so I could post a cool tutorial, but my camera batteries were cannibalized by wii remotes again, so I only have pictures of some of the steps. Still, it was pretty easy, so I'll explain.

I cut 2 rectangles of fabric and folded them and sewed up the edges so that each one turned into kind of a bag shape. One was the lining, one was the purse.

the bags

Then I made a tube of fabric that fit the bottom of the bag, slid two rectangular pieces of batting into the tube, and sewed that really, really well. I didn't want the batting sliding around should the purse ever need to be washed. I sewed this tube of fabric, with the batting inside, firmly to the outside bottom of the lining of the bag. Oh yeah, the point of this is to firm up the bottom and help the bag hold its shape.

attached

sewed up really well so the batting won't slip around
Then I stuffed the lining into the purse, wrong sides together, and sewed the sides in place (top stitching down each vertical seam, and at the T junction at the bottom). And then I made the straps. Four long rectangles of fabric, because I wanted the straps to show the lining fabric on the underneath, so I had to make pieces of both. Lots of ironing and sewing to get those straps made.

Oh, before I put the lining in, I did put in two pockets. I call them library card pockets, or library book pockets. I don't know what they are really called. Just two rectangles of fabric, sewed around on three edges, open on top.

the pockets, before
the pockets, after
Then, catching back up now, I pinned the straps between the top of the lining and the purse, right where I wanted them. I also made and pinned in a flap to serve as visual interest and a closure for the bag. All those things pinned in place and now I sewed around the top edge, folding the raw edges to the inside, and finishing up the bag. I added reinforcement stitching on the flap and the straps so that the weight of the bag won't pull against them too much.

all done
Very last, I sewed on the cute little belt loop thing to hold the flap.

belt loop thing close up

Mom loves it, and I got to give it to her in person, so that's an added bonus (she's here visiting, thanks to some frequent flier miles we had built up). 

I highly recommend the use of a sewing machine, though, if you want to make a bag like this. At least for the straps -- quite tedious, sewing all of those straight lines.

So, what have you been up to lately?? 

Wednesday, July 6, 2011

Strength in Union


This is the  next block in the diary quilt procession -- Strength in Union. It's meant to be a patriotic block, with red, white & blue but I tweaked it to fit our life and better reflect who I am these days.

While I will always and forever be a proud American, patriotic to the core, and even more than that a proud Texan, the fact is I love Brazil almost as much. So I chose to combine the two -- red and blue for the USA and green, blue & yellow for Brazil.

Living here, I have to try and merge my American self into Brazilian culture. I have to unite the two sides of me, becoming neither one nor the other but a mixture of both.

I have to set aside the American tendency to impatience and take up the Brazilian way of relationship above efficiency. So that instead of glancing at my watch every 2 minutes in line at the grocery store, I chat with my husband and enjoy the uninterrupted conversation now that we are able to shop without the boys in tow.

I have to remind myself that while Americans are very private and keep certain subjects to themselves, Brazilians are not being nosy, but being caring, to ask about those very things. So that when my neighbor, who I've spoken to three times in two years, tells me all about her husband leaving her I'm not so shocked I don't know how to respond. And when the other neighbor asks how things are I'll feel comfortable giving her an honest answer, since she is truly interested and not just for the sake of gossip.

I have to embrace the inner Brazilian that lets me wear a bikini to the beach, or heels to the grocery store, or wedge sandals to the park and leave behind the conservative American home school mom who cringes at the thought of exposing, gasp!, my midriff on a summers' day, or the practical chasing a busy boy mom side of me who cannot bear the thought of anything but tennis shoes at the park. (solution: send the dad chasing after the busy boy....)

I have to hang on to the very American desire for quality workmanship and work ethic when dealing with those who work for us - not just our house helper, Antonia, who's amazing, but doctors, dentists, etc. who will do the bare minimum if we let them. Like the time we had the wood revarnished, and the worker spilled varnish on the side of the house. I  had to be very unBrazilian and tell him to clean it, to my satisfaction, in hopes of not having to repaint later myself. (that got it mostly clean...).

I take the foods we can buy here and cook them in ways that are familiar to me, merging the cuisine into something neither American nor Brazilian, but down right good. I buy our movies where all Brazilians buy their movies (at the market in Centro....), but I buy them in English, merging my home culture with my host culture, bit by bit, inch by inch, until now, almost 4 years later, I've kind of lost sight of which is which. I've become neither/nor, either/or, not wholly one or the other but a mixture of both and so much the stronger for it.

 A Texan in Brazil. The red, white & blue in a sea of green, blue & yellow. Merging, mingling, becoming more than, not less than. Different, better, stronger. And I find as I unite these two sides of me, these two countries I've now called home, that there is Strength in the Union.

If you've moved away from your home town, even if not to a new country, has your new home left its mark on you? And do you find yourself better for it?