So, the color change/You & I quilt didn't win in the Blogger's Quilt Festival, but I had so much fun entering and want to thank all those who did go vote for my quilt -- thank you!! It was amazing to see the other quilts in the contest, and to hear from some of you that mine really was one of the better quilts. Sweet!! I don't quite believe it, but it was nice to hear anyway :)
I have been busy working on a few projects, but they are all Christmas gifts so I can't show them off. Finished up a black & white wall hanging for one gift, and I'm assembling the blocks I did in the Gen X Quilters BOM into the two quilts for those recipients.
I am excited to show those off, when I finish and gift them. I got busy doing other quilts this year and so only finished 6 blocks/3 months' worth of the BOM. To finish the lap quilts, then, I cut 9.5" squares of coordinating & background fabric to get up to a 7 x 7 block arrangement (making a roughly 63" x 63" quilt, good for a lap/throw size) and arranged the blocks I had, intermingled with the fabrics, and wound up with two very different quilts.
Each one was arranged with the recipient in mind, and I know they are both going to love the end result. And it turned a UFO, orphan blocks, into finished quilt, FAST. Super fast. Love that. All the fabric came from my stash (thank goodness I used to just guess and buy a ton of fabric instead of calculating, so I had lots of leftovers of the main fabrics...), all I had to buy was batting and thread, making these really inexpensive gifts, too. Yay!! Love that.
I just hope my recipients don't expect new quilts every year.....eek!
I have some mug rugs to work on as soon as I get the lap quilts, quilted; those I can show off as I go. They're for an on-line swap with a group of forum buddies, and I found some more fantastic Brazil-ish fabric to use so I finally have a good idea what to do for them. Can't wait!
Hopefully I still get them done in the midst of moving......Wish me luck!

Monday, November 11, 2013
Sunday, October 27, 2013
BQF: "You & I" Color-Change Quilt
Hi & Welcome! If you've stopped by from BQF/Blogger's Quilt Festival, thank you! My name is Heather, aka The Reader, aka Learning-as-I-Go, depending on where you bump into me around the web. I've been quilting for only a handful of years (since 2010), though have only been using a machine for a year now (since August 2012). In the year since I bought my machine I have finished a baby quilt, a bed quilt for each of my three sons, a Christmas tree skirt, Christmas stockings, place mats, assorted other small projects, a quilt top for my bed (which will be long arm quilted by someone else), and now this quilt for my husband.
Most of my projects are completely original designs, imagined by me then drawn up in EQ7 software, then machine pieced, appliqued (if needed), and quilted all on my little Janome Magnolia 7318. I fit quilting in & around my life --- I'm a homeschooling mom to three boys, ages 16, 12 and 8 --- but then, who doesn't?! Quilting is my sanity saver, hobby, favorite pass time, creative outlet, etc.
Enough about me, though; on to my Blogger's Quilt Festival entry quilt! I entered this quilt in the Bed Quilt Category; voting runs November 1 - 7, so be sure and go back and vote for my quilt next week if you enjoy this post :)
This quilt, titled "You & I: The Q-H Bond" was a gift for my husband. Just as I finished the quilt for our youngest son, we found out that we will soon move back to the United States after six years of living in Brazil. Unfortunately, my husband will have to travel back & forth, back & forth, back & forth, spending two weeks in the US and then two weeks in Brazil, until the transition is complete and the replacement is properly trained. This schedule could last up to a full year, though we hope not.
Immediately, I wanted to make him a quilt. He'll be renting a room from friends, and I felt very strongly that his home away from home should have its own quilt, so he could sleep under something I made, could feel that he has a little piece of me, of us, with him even while he's away. Sappy, I know. I can't help it.
Then I obsessed. For ages. This quilt needed to be perfect. Stunning. Masculine. Something he would *LOVE* and not just like okay. Finally I enlisted his help, and he said he'd like a quilt that "faded from blue to red." Egads. Does he not realize how much purple is between red & blue on the color wheel?! How would I make that masculine???? I was not thrilled.
I headed to a little quilt shop and wandered for ages looking for just the right "masculine purple" fabric. Ha! I think the shop owner thought I was nuts, but I did finally find it --- a Ricky Tims Rhapsodie Coloree in red/blue. Perfect! From there I found the rest, choosing to go light blue to red-orange. The YLI variegated thread to quilt with was the perfect extra touch.
Next up, size. The quilt would not be landing on a bed once it came home to our permanent home, so I didn't want it to be truly full sized, but it did need to be big enough to sleep under. Hmmmm. I measured a bed of the right size and based my measurements on that, tweaking the EQ7 design until I got a quilt the right size, using only the fabric amounts I had purchased (one yard of each color) as now back in Brazil I couldn't buy more. Tweak, tweak, tweak. This is when I'm very glad I draw my own patterns/designs. The end result is a quilt that fits a twin sized bed perfectly, even though he'll be sleeping on a full sized bed, so that we can use it for a couch throw later.
I chose an elongated chain for the border, as a stylized DNA strand; one side blues, the other reds, to represent him & me, me & him, "you & I," intertwining our lives, as "two become one" in marriage. And because he's a chemist, who once upon a time wrote me a poem that likened him & me, me & him, "you & I" to a basic molecular bond, the C-H bond, the building block of life. Only we were the Q-H bond. Such is what happens when chemists decide to write poetry, but it was sweet, we were young, and I still treasure that imagery and wanted to honor it by including it in this quilt for him.
Piecing the border, as genius an idea as it was, gave me fits. I always forget to pay attention to things like placement and what-not, and with these little bits I chain pieced, assembly-line assembled, and then discovered that one block per side is mirror-image of the rest, which means I ripped out a LOT of seams. Seventeen total in this quilt, all of those in the border. Egads. You can see below where I pieced one wrong; I made a lot of these sorts of mistakes on the 1st side of the border.
Still, lessons learned on the first side means fewer mistakes on the other three sides. I kept working, payed close attention through the rest of the quilt assembly, and within a few more days, the border was done & on, ready for quilting.
For the back, recycled denim, made from various bits & pieces of discarded jeans once worn by each member of our family.
A ripped knee, with a bit of purple fabric behind like a reverse patch. Half a pocket, by his request. Fading dark to light to mimic the color change of the front.
Jeans, because we're frugal. Denim, because he wanted to leave out the batting as it will be summer in Brazil when he begins his travel schedule, and because I feared just cotton would be too thin without any batting at all. Our jeans, so that he can carry each one of us with him and be tangibly reminded of home, every single night. Like I said, I'm sappy. I can't help it.
Backing and top both ready to go, I pin basted and quilted on my little Janome; vertical double-helix strands, running every 3.5" or so, in the color-change thread on front and a blue-to-white variegated King Tut in the bobbin. DNA, his & mine, mine & his, intertwined. Holding the quilt together, as together we support, encourage, hold up, and hold together each other and our family.
I left the border intentionally plain, per his request. I did follow the colored chain and quilt over that to stabilize the border some, but the black is left empty for contrast. The label was printed on fabric, then machine appliqued, and the binding was done by machine.
I hope you love this quilt as much as I do. It's my favorite quilt so far; I really think it's my best yet. I hope you agree!
Most of my projects are completely original designs, imagined by me then drawn up in EQ7 software, then machine pieced, appliqued (if needed), and quilted all on my little Janome Magnolia 7318. I fit quilting in & around my life --- I'm a homeschooling mom to three boys, ages 16, 12 and 8 --- but then, who doesn't?! Quilting is my sanity saver, hobby, favorite pass time, creative outlet, etc.
Enough about me, though; on to my Blogger's Quilt Festival entry quilt! I entered this quilt in the Bed Quilt Category; voting runs November 1 - 7, so be sure and go back and vote for my quilt next week if you enjoy this post :)
 |
| You & I: The Q-H Bond blue-to-red color change quilt twin sized, original design machine pieced, machine (domestic) quilted |
This quilt, titled "You & I: The Q-H Bond" was a gift for my husband. Just as I finished the quilt for our youngest son, we found out that we will soon move back to the United States after six years of living in Brazil. Unfortunately, my husband will have to travel back & forth, back & forth, back & forth, spending two weeks in the US and then two weeks in Brazil, until the transition is complete and the replacement is properly trained. This schedule could last up to a full year, though we hope not.
Immediately, I wanted to make him a quilt. He'll be renting a room from friends, and I felt very strongly that his home away from home should have its own quilt, so he could sleep under something I made, could feel that he has a little piece of me, of us, with him even while he's away. Sappy, I know. I can't help it.
Then I obsessed. For ages. This quilt needed to be perfect. Stunning. Masculine. Something he would *LOVE* and not just like okay. Finally I enlisted his help, and he said he'd like a quilt that "faded from blue to red." Egads. Does he not realize how much purple is between red & blue on the color wheel?! How would I make that masculine???? I was not thrilled.
I headed to a little quilt shop and wandered for ages looking for just the right "masculine purple" fabric. Ha! I think the shop owner thought I was nuts, but I did finally find it --- a Ricky Tims Rhapsodie Coloree in red/blue. Perfect! From there I found the rest, choosing to go light blue to red-orange. The YLI variegated thread to quilt with was the perfect extra touch.
 |
| the fabrics & thread |
 |
| the EQ7 drawing; my road map for piecing the quilt Border chain fades from light, medium, dark, medium, light; 1 strand in blues, the other in the reds, traveling around the quilt |
I chose an elongated chain for the border, as a stylized DNA strand; one side blues, the other reds, to represent him & me, me & him, "you & I," intertwining our lives, as "two become one" in marriage. And because he's a chemist, who once upon a time wrote me a poem that likened him & me, me & him, "you & I" to a basic molecular bond, the C-H bond, the building block of life. Only we were the Q-H bond. Such is what happens when chemists decide to write poetry, but it was sweet, we were young, and I still treasure that imagery and wanted to honor it by including it in this quilt for him.
 |
| the quilt top, ready for the border |
Piecing the border, as genius an idea as it was, gave me fits. I always forget to pay attention to things like placement and what-not, and with these little bits I chain pieced, assembly-line assembled, and then discovered that one block per side is mirror-image of the rest, which means I ripped out a LOT of seams. Seventeen total in this quilt, all of those in the border. Egads. You can see below where I pieced one wrong; I made a lot of these sorts of mistakes on the 1st side of the border.
 |
| oops. Notice that the "red" is sewn on wrong on the corners that 4-patch unit had to be taken off, then taken apart and resewn in reverse before being reattached correctly. Oops. |
 |
| and now, with the border on, but not trimmed yet |
For the back, recycled denim, made from various bits & pieces of discarded jeans once worn by each member of our family.
 |
| the back, fading from dark to light as it moves top to bottom completely pieced from our old jeans |
 |
| ripped "knee" detail, with reverse applique patch |
 |
| half a pocket, by his request |
Jeans, because we're frugal. Denim, because he wanted to leave out the batting as it will be summer in Brazil when he begins his travel schedule, and because I feared just cotton would be too thin without any batting at all. Our jeans, so that he can carry each one of us with him and be tangibly reminded of home, every single night. Like I said, I'm sappy. I can't help it.
 |
| the quilting, from the back -- vertical double-helix lines throughout the quilt, with over-sized double helix lines following the colored chain of the border, in both directions |
 |
| close-up of the double helix quilting on the front |
I left the border intentionally plain, per his request. I did follow the colored chain and quilt over that to stabilize the border some, but the black is left empty for contrast. The label was printed on fabric, then machine appliqued, and the binding was done by machine.
 |
| the label, created in Word, printed on fabric, machine appliqued (the same blue from the lightest side; color is off in the photo) |
I hope you love this quilt as much as I do. It's my favorite quilt so far; I really think it's my best yet. I hope you agree!
Friday, September 27, 2013
The Mario Quilt, Finished
Finally done! This quilt was a lot of fun to build and put together, all at the direction of my eight year old son, who dictated each aspect of the scene --- from having half a "Goomba" (that funny looking, one-eyed creature on the bottom left corner), to the shadows under the floating-in-midair coins (top right).
I absolutely loved collaborating with him, although I did suggest in the beginning that we do the scene so that it fit just on the center, the part that would actually sit atop his bed, and thus be able to see all of it. We could do a border around the edge. He didn't like that idea, and wanted the border to be further extension of the scene. The other boys claimed too that the quilt needed to be edge-to-edge in order to have the level of detail we wanted; I was not willing to compromise on how small to make each patch, and so edge to edge it is.
Even though it does, in fact, hang over the sides and mean the whole scene is not fully visible at once.
Still, I quilted it up this week --- I used YLI Invisible thread for the quilting, and King Tut variegated blue to white in the bobbin, to match the sky blue backing fabric. The two threads worked beautifully together!
This quilt was easier to quilt than some of my others, due to a couple of things. One, I bought actual pins while in the US, so it was much easier to baste, and the basting stayed put. Huge difference that made. Huge. Also, I ironed/pressed everything before I started this quilt and as I went along. The fabrics were all ironed and starched before I cut; the sections were all pressed as I finished each one; huge difference. Next time I will remember to give a final press to the top and iron the backing fabric, tedious as those jobs are. The other factor was size; the last two quilts I've done have both been for a full sized bed, while this one is for a twin. That little-bit-less bulk made it so much easier to handle!
It's now been washed & dried --- love using Shout Color Catchers --- the red next to white, and the black against the yellow and light blue both had me worried. I threw in 8 color catchers (which all came out just barely the lightest peach color, so maybe the fabrics didn't bleed terribly anyway) and it was totally fine. Whew! I'll probably keep using color catchers for the next few washes just in case; better safe than sorry!
I'll start cutting the fabric for my husband's quilt next week....this weekend, I need a break!
I absolutely loved collaborating with him, although I did suggest in the beginning that we do the scene so that it fit just on the center, the part that would actually sit atop his bed, and thus be able to see all of it. We could do a border around the edge. He didn't like that idea, and wanted the border to be further extension of the scene. The other boys claimed too that the quilt needed to be edge-to-edge in order to have the level of detail we wanted; I was not willing to compromise on how small to make each patch, and so edge to edge it is.
 |
| on my bed, showing the full scene, edge to edge |
Even though it does, in fact, hang over the sides and mean the whole scene is not fully visible at once.
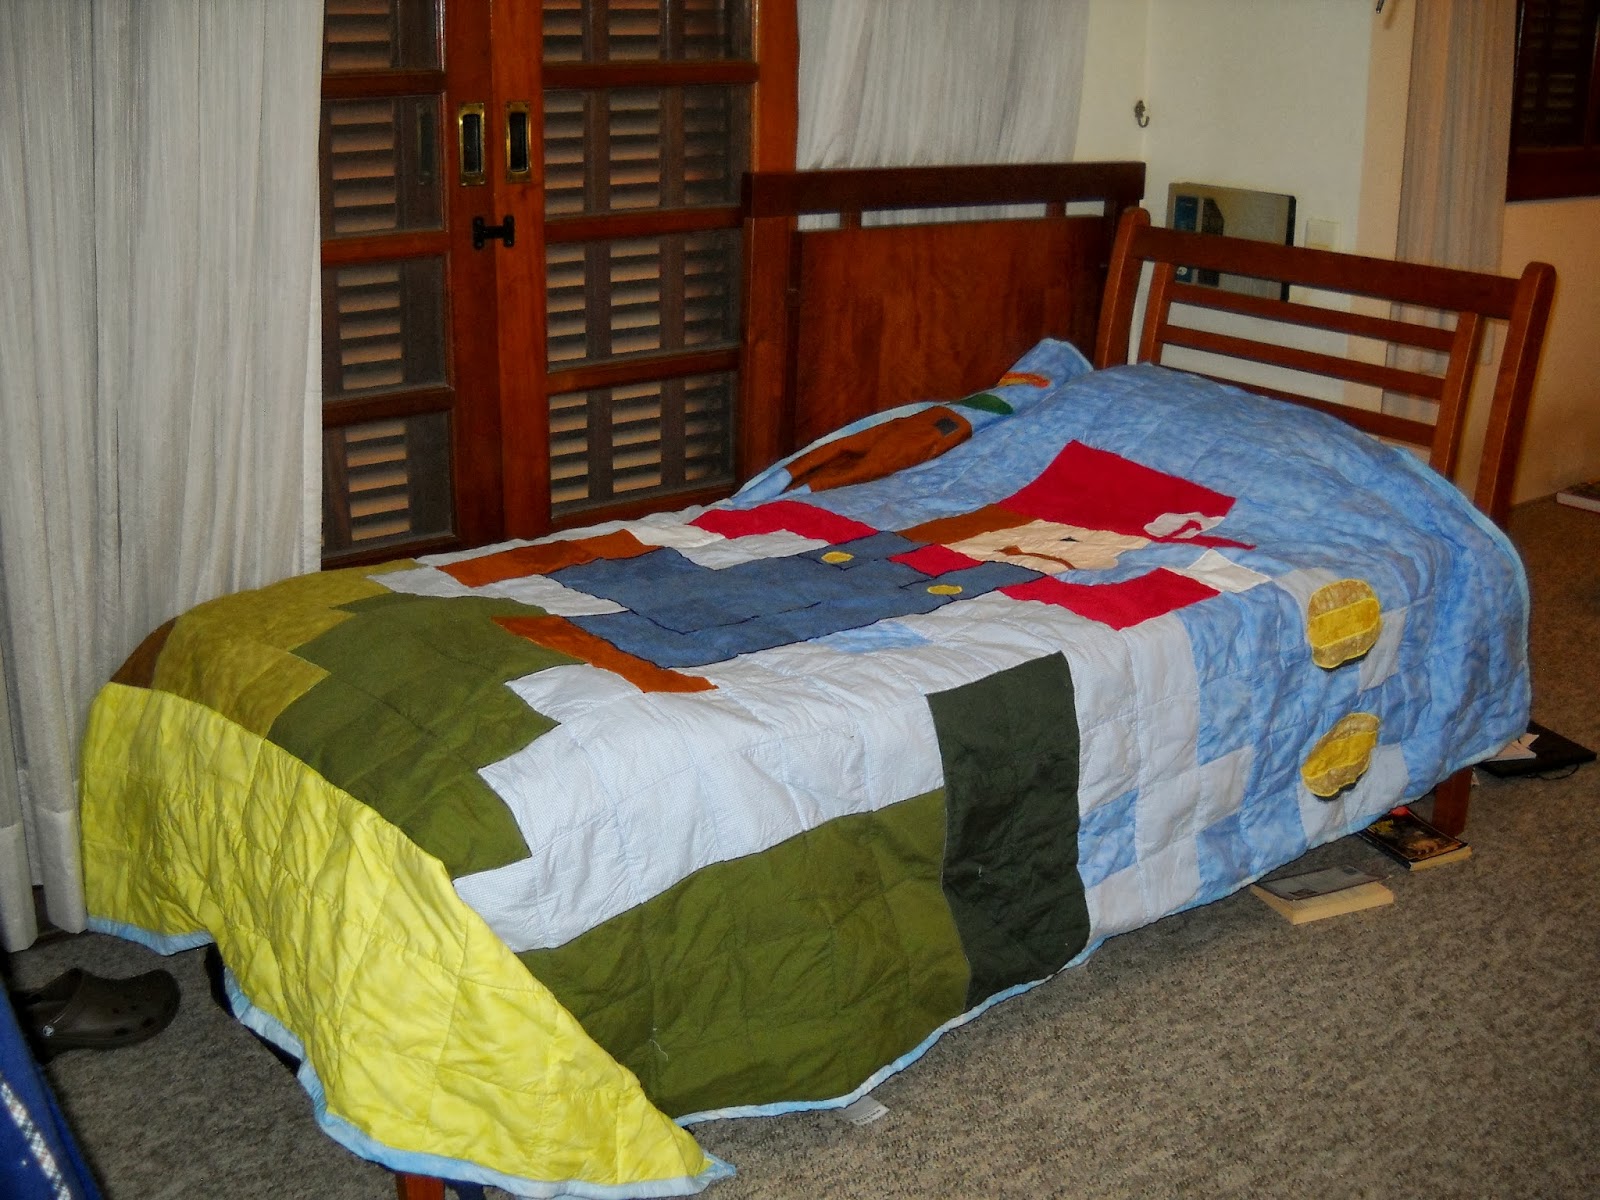 |
| on his bed, scene not fully visible |
This quilt was easier to quilt than some of my others, due to a couple of things. One, I bought actual pins while in the US, so it was much easier to baste, and the basting stayed put. Huge difference that made. Huge. Also, I ironed/pressed everything before I started this quilt and as I went along. The fabrics were all ironed and starched before I cut; the sections were all pressed as I finished each one; huge difference. Next time I will remember to give a final press to the top and iron the backing fabric, tedious as those jobs are. The other factor was size; the last two quilts I've done have both been for a full sized bed, while this one is for a twin. That little-bit-less bulk made it so much easier to handle!
It's now been washed & dried --- love using Shout Color Catchers --- the red next to white, and the black against the yellow and light blue both had me worried. I threw in 8 color catchers (which all came out just barely the lightest peach color, so maybe the fabrics didn't bleed terribly anyway) and it was totally fine. Whew! I'll probably keep using color catchers for the next few washes just in case; better safe than sorry!
I'll start cutting the fabric for my husband's quilt next week....this weekend, I need a break!
Friday, September 20, 2013
Shopping Trip! aka, What's Next in Line?
My family & I recently went home for a visit to the US, and of course I hit my favorite quilt shops while there. Fabric in Brazil is expensive, not as fun, expensive, harder to find, and expensive. As I loaded up on yard after yard of fabric, a little worried about the price, I reminded myself "it would be four times this in Brazil....." Amazingly, I stuck to my plans for shopping and didn't go crazy with extras.
First up -- backing for the Diary Quilt. I failed to snap a photo before I sent it off to my very dear friend & long-arm quilter, who will finish it for me, but I got a really yummy butterfly batik in blues & greens. I kind of think it's too modern for the front, and a little part of me wishes I'd stuck with the cream colored print that was old letters, or else the tone-on-tone cream & beige that was dandelions. I shied away from the creams because I didn't want the back to show dirt. I am probably going to second-guess that decision for a while, but I'm telling myself two things to help --- one, the butterflies are significant, and I do love that I found a great butterfly print. Love it. Two, I think a modern back to a traditional front fits since I'm a more modern quilter; it gives one more level to the "past, meet future" aspect of the quilt. And anyway, it's done now; too late and too expensive to change it at this point. (yes, I did consider buying the other fabric and saving the butterflies for something else.....but that many yards is a lot to just buy extra.....).
Second up -- backing for the Mario Quilt. My boy requested sky blue, so that's what he got. I had a moment of panic last night thinking I forgot to get thread for the bobbin -- I'm using clear thread by YLI for the front -- until I remembered I have some blue-to-white variegated King Tut I can use, if it's not too much for the bobbin.....
Third and almost last, the next in line -- a quilt for my husband, The Chemist. We are facing a move soon, back to the US, but he'll be traveling back & forth quite often. I wanted to make him a quilt he can keep at his "other home" so he's still sleeping under something I made, even while he's away. Sappy & sentimental, I know. It will be an oversized couch quilt when he gets done traveling.
I had him look through images online and pick out a rough idea of what he wanted. He found a strip quilt that was sort of color-blocked, and said, "That one. I like that. But in a different color scheme.....I want it to fade from blue to red...."
I panicked only a little trying to figure out how to get from blue to red without so much purple that it stopped looking masculine. Then I took my mom & sister shopping and we wandered a quilt shop for a really long time, looking at every single purple fabric in the store. I almost gave up, and then I found it, a red & blue overlapping thing. Once we had the purple, the rest was a cinch. I even found a perfect variegated thread to quilt it with; can't wait to get started!
For real last, I did buy a few things just because. The multi-on-black Sew Heavenly print, which is now out of print, which I have loved and wanted since its debut. I still hope to find the cream tone-on-tone of it, but no one seems to have that one.....(sigh). The Chemist got me the all blue version and the multi-on-blue version for my birthday last year.....I couldn't resist snagging some of this, too. I think these will be incorporated into a back for another couch quilt. I really have a thing for bold, busy backs as a way to showcase fabric I love.
and, who can resist a few fat quarters?! The 2 dark blue are to replace some I borrowed from my stash for the Diary Quilt border; the rest are just 'cause they seemed awesome. Fat quarters are my downfall.....I have yards and yards of stash made up of fat quarters.
What fabric style do you buy? Yardage? Pre-cuts? Fat Quarters? What is it you just can't resist in a fabric shop??
First up -- backing for the Diary Quilt. I failed to snap a photo before I sent it off to my very dear friend & long-arm quilter, who will finish it for me, but I got a really yummy butterfly batik in blues & greens. I kind of think it's too modern for the front, and a little part of me wishes I'd stuck with the cream colored print that was old letters, or else the tone-on-tone cream & beige that was dandelions. I shied away from the creams because I didn't want the back to show dirt. I am probably going to second-guess that decision for a while, but I'm telling myself two things to help --- one, the butterflies are significant, and I do love that I found a great butterfly print. Love it. Two, I think a modern back to a traditional front fits since I'm a more modern quilter; it gives one more level to the "past, meet future" aspect of the quilt. And anyway, it's done now; too late and too expensive to change it at this point. (yes, I did consider buying the other fabric and saving the butterflies for something else.....but that many yards is a lot to just buy extra.....).
Second up -- backing for the Mario Quilt. My boy requested sky blue, so that's what he got. I had a moment of panic last night thinking I forgot to get thread for the bobbin -- I'm using clear thread by YLI for the front -- until I remembered I have some blue-to-white variegated King Tut I can use, if it's not too much for the bobbin.....
 |
| backing fabric for the Mario Quilt |
I had him look through images online and pick out a rough idea of what he wanted. He found a strip quilt that was sort of color-blocked, and said, "That one. I like that. But in a different color scheme.....I want it to fade from blue to red...."
I panicked only a little trying to figure out how to get from blue to red without so much purple that it stopped looking masculine. Then I took my mom & sister shopping and we wandered a quilt shop for a really long time, looking at every single purple fabric in the store. I almost gave up, and then I found it, a red & blue overlapping thing. Once we had the purple, the rest was a cinch. I even found a perfect variegated thread to quilt it with; can't wait to get started!
 |
| fabric, in order, for The Chemist's color-change quilt |
 |
| SewHeavenly by Dan Morris for RJR fabrics |
 |
| just for fun |
Monday, August 5, 2013
One More Finished Top -- The Diary Quilt
This quilt is probably the most emotionally significant project I've done to date, and likely will remain so for a very long time. It is the second project I ever started, with fabric purchased in March 2011, and the first block pieced (by hand) that April.
Today, August 2013, I took the final stitch (by machine) on the quilt top. Two years, four months. That's a long time in the making, and it's still to be quilted, but I need to buy backing fabric first and then work up the nerve to quilt it myself, or send it to my favorite long-arm quilter.
Each block tells a story. The center squares of each were pieced by hand, because I didn't get my machine until August 2012, and by then, I'd finished the blocks. Then I added setting triangles, to turn them on point and enlarge the quilt; I did that by machine. For a long time I had a pile of blocks sitting and waiting, while in the meantime I worked on quilts for my boys. The Comic Book Quilt for my oldest; then the Legend of Zelda's Cat Quilt for my middle son, and most recently the Mario Quilt for my youngest. With that last quilt top finally done, I was once again free to return to my project instead of one of theirs.
I tackled the most difficult chore of assembling my first "on point" quilt. Much trial and error, terrific use of the seam ripper, and finally I had all the rows together in order and the top emerged. Whew! It wasn't easy. I messed up, a lot. But I did it, and turned to my stash to figure out borders. Now that I was so close, I wanted it done, and I didn't want to spend extra money if I didn't have to.
I added the top row of straight-set blocks, to incorporate an antique block (by creating additional blocks that mimic the antique one). I edged the whole entire top in the black & white background print, then added a blue inner border from stash fabric from another project and then I planned and plotted. I wanted scrappy, but planned. I didn't want the borders to look like they were thrown together at the last minute, even though they were.
A friend suggested I do evenly spaced hour glass blocks, in scrappy fabrics from the quilt top. I kept seeing in my head pinwheels instead of hour glasses, so worked up a Piano Key/Spaced Squares border on my EQ7 software. Then I cut all my scraps into the length I needed (the unfinished width of the border) and into 2 different sized widths to give a more interesting look to the border. I cut pinwheel pieces, and sewed those. And then yesterday I finally worked on that border and it all came together.
Today I measured and figured and measured and figured and swiped one more fat quarter from my stash so I could do an outer border in the same solid navy as the inner border, so that the piano key/scrappy border would seem to float the way the blocks do. More cutting and sewing and measuring and pinning and sewing and then......it was done.
Checked it on the bed to be sure it was really, truly the right size. It is.
And so, at long last, the quilt top that started as a pile of carefully chosen fabric in March 2011 is now a finished top, waiting on backing and quilting, as of today, August 5, 2013. I am still in awe......and hopeful it won't be another two years before the quilting is done!
Today, August 2013, I took the final stitch (by machine) on the quilt top. Two years, four months. That's a long time in the making, and it's still to be quilted, but I need to buy backing fabric first and then work up the nerve to quilt it myself, or send it to my favorite long-arm quilter.
Each block tells a story. The center squares of each were pieced by hand, because I didn't get my machine until August 2012, and by then, I'd finished the blocks. Then I added setting triangles, to turn them on point and enlarge the quilt; I did that by machine. For a long time I had a pile of blocks sitting and waiting, while in the meantime I worked on quilts for my boys. The Comic Book Quilt for my oldest; then the Legend of Zelda's Cat Quilt for my middle son, and most recently the Mario Quilt for my youngest. With that last quilt top finally done, I was once again free to return to my project instead of one of theirs.
I tackled the most difficult chore of assembling my first "on point" quilt. Much trial and error, terrific use of the seam ripper, and finally I had all the rows together in order and the top emerged. Whew! It wasn't easy. I messed up, a lot. But I did it, and turned to my stash to figure out borders. Now that I was so close, I wanted it done, and I didn't want to spend extra money if I didn't have to.
 |
| blocks, with sashing added, rows laid out |
 |
| the top before any borders MUCH trial and error to get the rows correct, as I originally added the triangles flush with the wrong side of half the rows |
 |
| side view of the top row the center off white/pink block is an antique the rest were made to mimic that |
Today I measured and figured and measured and figured and swiped one more fat quarter from my stash so I could do an outer border in the same solid navy as the inner border, so that the piano key/scrappy border would seem to float the way the blocks do. More cutting and sewing and measuring and pinning and sewing and then......it was done.
 |
 |
| on our bed, with each border falling just where I hoped it would (color is more accurate in the previous photo taken outdoors) |
Monday, July 15, 2013
...and DONE! Super Mario Quilt for a Super Boy!

So, I meant to have step-by-step and progress photos/posts along the way, but I kept working and forgetting to take pictures. Oops!
I'll be back with some close-up shots later on, because every single component is outlined with a tight zig-zag stitch (you can see it a bit on the overalls, where I cut in to give detail between the legs, around the straps, etc.). Yes, that is A LOT of work, and a LOT of thread! But so worth it!
My little boy is THRILLED! He designed the whole thing, based on the Super Mario game that is so popular. He explained each item he wanted, where he wanted each thing placed, etc. I had an amazing time collaborating on this with him! If you've never collaborated on a quilt with an 8 year old.....it is truly something magical, that's for sure!
I'm setting aside the top, for now, and will quilt it after an upcoming US trip; with so many color changes, and not wanting red quilting lines across Mario's face, for example, I decided I'd better use clear thread, which I can't get here. So, folded and to the shelf it goes for now, waiting on thread and backing fabric, and I'll quilt when we're back from our trip.
So glad to have the top done, though!! and my boy is happy, which makes all the hard work so very worth it!
Friday, June 21, 2013
Top Third Completed! The Super Mario Quilt is on its way!
I am so glad I thought to segment this quilt into sections (not sure what I'm talking about? click on the "Super Mario Quilt" link/tab below this post and read up on previous posts....) rather than do straight rows across as I usually would. Being able to see recognizable portions of the picture come together is so much more encouraging than just row after row after row of colored blocks!
The section with the brown square, known as an Item Block, was first. Didn't look like much until I added the little black rivets or detail bits, per my 8 year old's instructions, but once that was added, it looked like what he wanted.
Next was the section with Mario's face. As just a set of blocks, it was a bit boring. I had my son pull up on-line images showing me the facial features we needed to add -- as this is a side view, we added one eye, his nose, his mustache, and half the white circle & half the red M on the hat. My son said we could skip the sideburns and ear.
Then I appliqued on the coins floating in the air. Again, pulled up a picture and my boy explained that I had to include the black, not blue, shadow behind the coin. So I drew that out, cut it from the yellow fabric he chose from my stash, and glued then sewed down the coins. Whew! What a difference they make!
Next, time to work on the body section.....sure is fun watching this come together, especially as a collaboration with my youngest son! So fun!!
The section with the brown square, known as an Item Block, was first. Didn't look like much until I added the little black rivets or detail bits, per my 8 year old's instructions, but once that was added, it looked like what he wanted.
 |
| just the Item Block (except I held it sideways, so the photo is sideways to make the quilt section right side up!) |
Next was the section with Mario's face. As just a set of blocks, it was a bit boring. I had my son pull up on-line images showing me the facial features we needed to add -- as this is a side view, we added one eye, his nose, his mustache, and half the white circle & half the red M on the hat. My son said we could skip the sideburns and ear.
 |
| Mario's face, hat & one arm in a sky background -- the Before |
 |
| Look! Mario has a face now! -- the After |
 |
| joined the Item Block section to the Mario Face section Before I added the appliqued coins |
 |
| cut & glued in place, waiting to be sewn down I used a machine super-tight zig zag applique |
 |
| don't those coins look good floating there?! |
Monday, June 17, 2013
Some Tips, and a Beginning
Whew! Let's get sewing on this thing, shall we?? Before I begin, though, a few things I did to make my life easier.
First, the problem of so many greens in one quilt. I did not trust myself to keep them all straight once they were cut into their squares and stacked in my "work in progress" tote. What to do so that I don't mix up which green I need and wind up short on one fabric, long on another??
I came up with an easy solution! Since I'm working from a color print out of the design anyway, I simply cut little pieces from the scraps of each and glued them to the color print out. Now, I have a fabric sample attached right where I need it, on the very print out I'll use as my map as I sew. Since I'll be looking at the print out to make sure I get each square in the right place anyway, this is perfect!
The other problem is, do I really want to sew one row together at a time (the quilt size is 75" x 100" finished); can you imagine making 20 rows, each 75" long? And then having to sew seam after seam to join those 75" long rows together??? Hmmm, that seemed daunting to me and like a perfect recipe for rows to go crooked and seams to go wonky. Not cool.
How to approach quilt assembly, then?? Back I went to the print out. I first thought simple quadrants, but that chopped things up too much and still left pretty large/long seams. Hmmmm. I looked a bit longer and decided to find natural breaks in the quilt and use those.
Perfect! Now I can do sections, see some progress as I go (and my 8 yr old son will see it too, this way) and then just join section to section and only have to do that long 75" seam twice! Brilliant!!
For the actual assembly, then, I just take a stack of what is needed for the mini-row within the section, sew the fabrics together one at a time (pressing seams open as I go, to reduce bulk), and then will assemble the mini-rows into their respective sections.
This will also enable me to do the embellishing on each section before it goes together as a full quilt top. As there's quite a bit of embellishing to do, that will be helpful and much easier to manage -- I need to add face details to the Mario, and outline his legs, add buttons to the overalls, that sort of thing. Much easier to handle in small chunks than as part of a whole twin sized quilt.
Can't wait to see this start to come together!
First, the problem of so many greens in one quilt. I did not trust myself to keep them all straight once they were cut into their squares and stacked in my "work in progress" tote. What to do so that I don't mix up which green I need and wind up short on one fabric, long on another??
I came up with an easy solution! Since I'm working from a color print out of the design anyway, I simply cut little pieces from the scraps of each and glued them to the color print out. Now, I have a fabric sample attached right where I need it, on the very print out I'll use as my map as I sew. Since I'll be looking at the print out to make sure I get each square in the right place anyway, this is perfect!
 |
| each green fabric, plus little scraps on the print out |
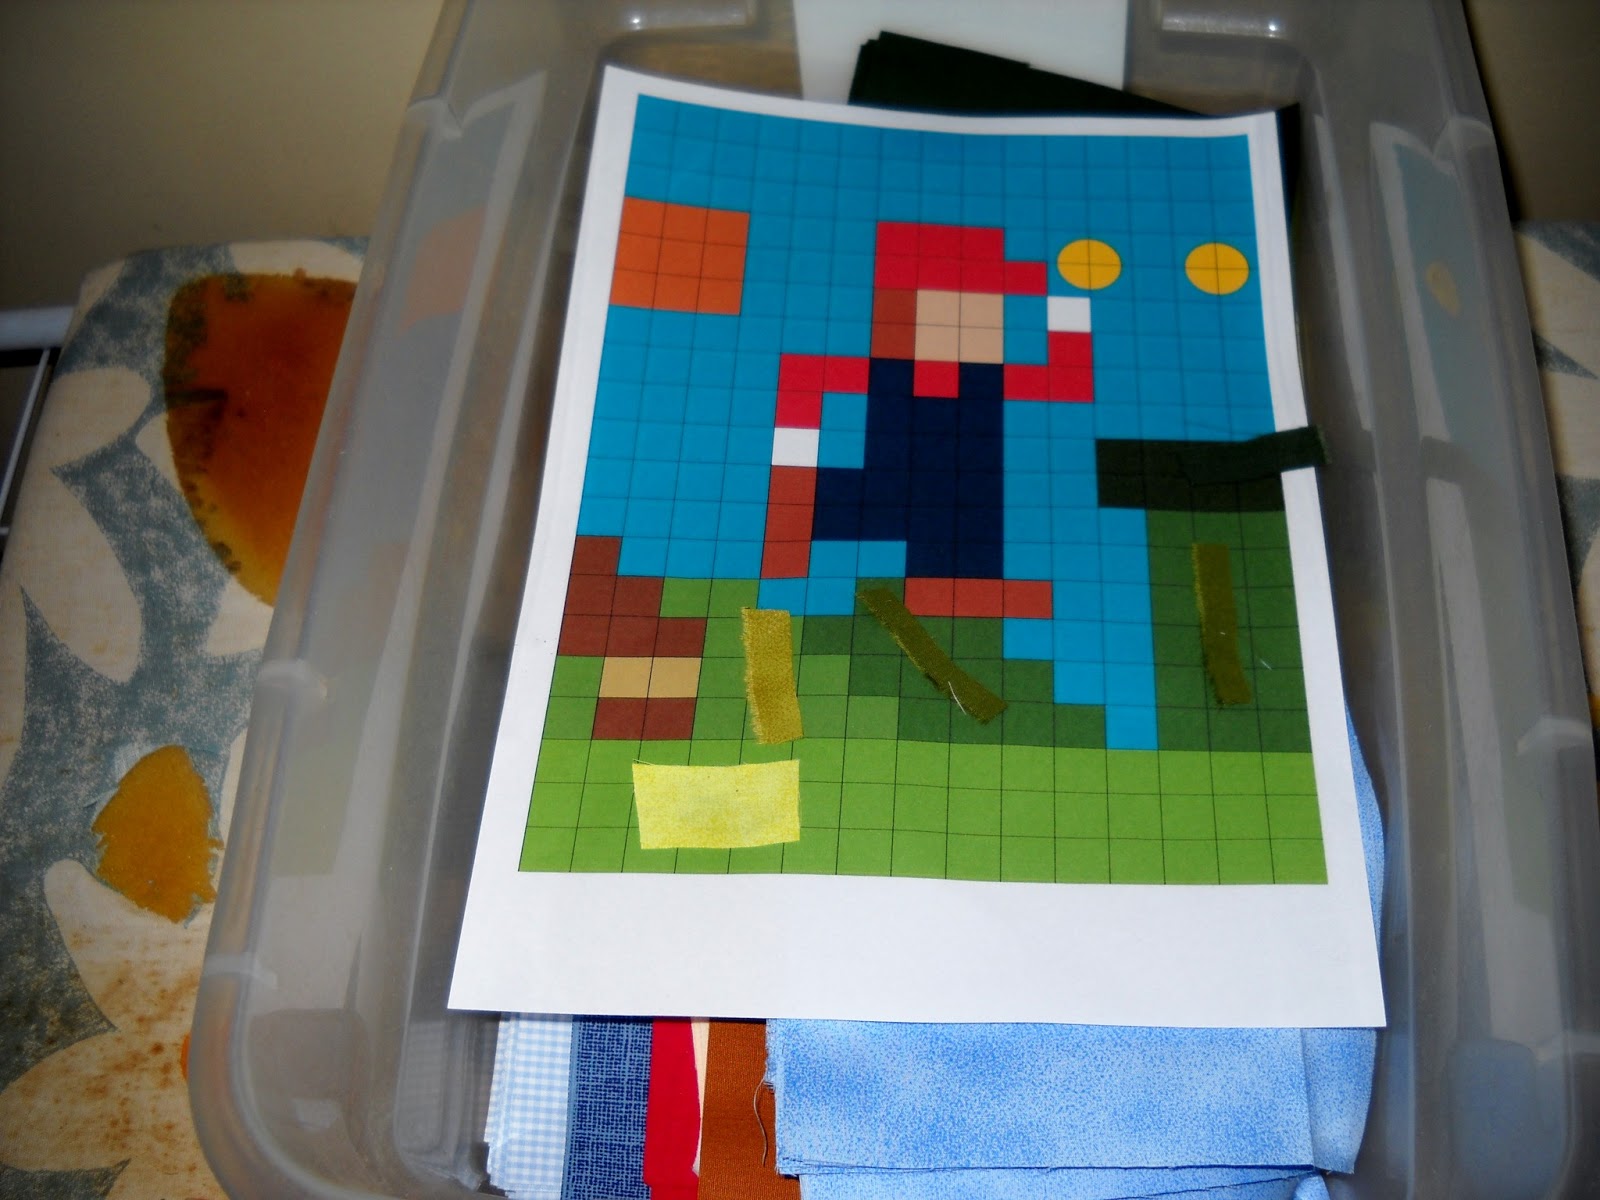 |
| the print out, in the tote with the cut squares, ready to go |
The other problem is, do I really want to sew one row together at a time (the quilt size is 75" x 100" finished); can you imagine making 20 rows, each 75" long? And then having to sew seam after seam to join those 75" long rows together??? Hmmm, that seemed daunting to me and like a perfect recipe for rows to go crooked and seams to go wonky. Not cool.
How to approach quilt assembly, then?? Back I went to the print out. I first thought simple quadrants, but that chopped things up too much and still left pretty large/long seams. Hmmmm. I looked a bit longer and decided to find natural breaks in the quilt and use those.
 |
| I used a highlighter to mark off what my sections will be top row: 2 sections, divided where Mario's head touches the sky on the left middle row: 3 sections, divided where Mario's arms bump sky on either side bottom row: 2 sections, divided at the edge of the 1st hill Staggering the seams will help the stability of the quilt, too. |
For the actual assembly, then, I just take a stack of what is needed for the mini-row within the section, sew the fabrics together one at a time (pressing seams open as I go, to reduce bulk), and then will assemble the mini-rows into their respective sections.
 |
| sewing! I have my print out (aka, map), my stack of squares, my 1/4" foot, and I am good to go! |
Can't wait to see this start to come together!
Thursday, June 13, 2013
And now, the next project! Super Mario Quilt for a Super Son!
With quilts finished for Son 1 and Son 2, my youngest suggested it was his turn for a quilt. I hand't actually planned to start his yet, because he very rarely sleeps in his own room -- our bedroom has a sort of dressing room area that holds an extra bed and he mostly ends up sleeping there. So why make a quilt for a boy who won't sleep in his real bed in his own room? Well, in hopes that said quilt will be the reason he needs to move back where he belongs, of course!
I took a lovely time out to work on the 15 Minutes of Play Architecture Challenge, but now that it's done (just waiting on binding), time to get on to the quilt my youngest wanted. Being as he's 8 yrs old, his tastes are a little.....well, fun. Whimsical. Little boy-ish. But not too little boyish, as he does have older brothers who are teens or almost teens. So what did Son 3 want? Why, a Super Mario Quilt, of course!
I scanned the internet for ideas. I found an absolutely adorable -- truly smashing! -- Quilt Along over at Cut to Pieces. I ruled it out right away, because living in S. America I do not have access to the fusible stuff that makes her QAL easy to do instead of absolutely crazy. I know my limits, and piecing a bunch of squares that finish at 1", in the traditional, good old fashioned piecing method --- not gonna happen. If you do have access to fusible stuff, her QAL is fantastic and I highly recommend it. If you don't, feel free to use my design instead.
Lucky for me, my son is fairly opinionated and wanted one big scene from the video game anyway, rather than several different characters or images. Whew! His desire and mylaziness self limitations work nicely together! I pulled up a simple patchwork layout on my EQ7 and had the boys help me color the squares to resemble the desired scene. My boy was very specific with exactly what he wanted, so I had him sit next to me and tell me when I got the colors just right. I chose the smallest size patch (5" finished) I was willing to work with, we colored in accordingly, and the design was done.
Later, I took my boy with me to buy fabrics, so he could confirm color choices, then I actually starched the fabrics before I cut them into the needed squares.
Why did I starch the fabrics?? Well, I've noticed that my quilts end up wrinkly. I have two theories on that --- one, some time ago I gave up pressing. At all. I finger press my seams as I go, but I quit pressing finished blocks, or rows, or quilt tops, or backs, or anything. And, well, it shows. Theory two is that I don't baste sufficiently, which is probably also true. This quilt needing to look crisp due to the design, I decided I'd better get over my lazy self and not skip steps like that anymore. So, I starched the fabric and then cut it.
Next up, let's get sewing!
I took a lovely time out to work on the 15 Minutes of Play Architecture Challenge, but now that it's done (just waiting on binding), time to get on to the quilt my youngest wanted. Being as he's 8 yrs old, his tastes are a little.....well, fun. Whimsical. Little boy-ish. But not too little boyish, as he does have older brothers who are teens or almost teens. So what did Son 3 want? Why, a Super Mario Quilt, of course!
I scanned the internet for ideas. I found an absolutely adorable -- truly smashing! -- Quilt Along over at Cut to Pieces. I ruled it out right away, because living in S. America I do not have access to the fusible stuff that makes her QAL easy to do instead of absolutely crazy. I know my limits, and piecing a bunch of squares that finish at 1", in the traditional, good old fashioned piecing method --- not gonna happen. If you do have access to fusible stuff, her QAL is fantastic and I highly recommend it. If you don't, feel free to use my design instead.
Lucky for me, my son is fairly opinionated and wanted one big scene from the video game anyway, rather than several different characters or images. Whew! His desire and my
| the EQ7 image |
Later, I took my boy with me to buy fabrics, so he could confirm color choices, then I actually starched the fabrics before I cut them into the needed squares.
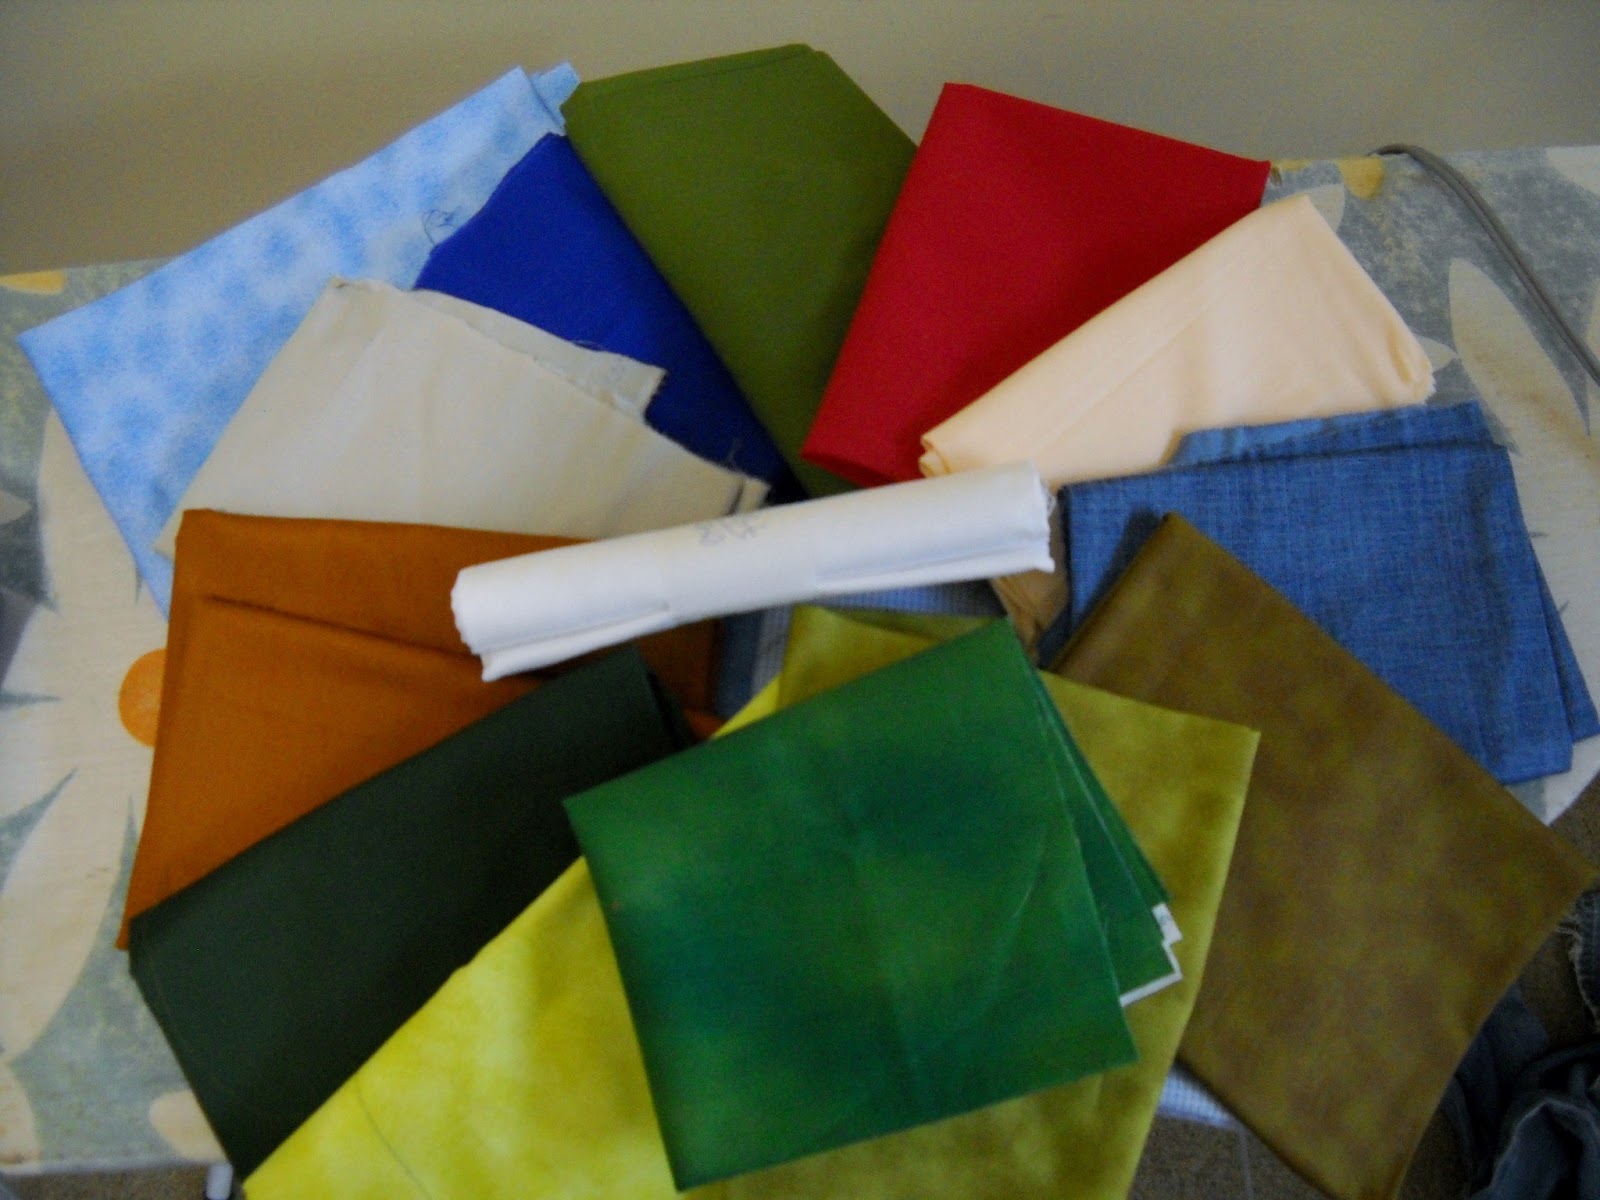 |
| all the fabric |
 |
| starching... |
 |
| starched... |
 |
| cut! that is a LOT of squares. so glad I went with 5" finished! |
Next up, let's get sewing!
Unexpected Inspiration
I have some fabric in my stash closet that I've been saving for just the right project. I used some of it for my place mats, and have been mulling over project ideas ever since. The colors are just bright and vibrant and fun, and I'm eager to get them into a throw sized or lap sized quilt for our couch.
I might have stumbled onto the project, and it came from the most unlikely of places: another video game.
Now, this video game is a computer based free-build sort of game. The player has a supply of digital blocks with which he (or she) can build pretty much anything he wants; my boys call it "Legos for the Computer". If you have kids in your life, you may have heard of it --- Minecraft. It's a fantastic way for kids to be creative.
Well, imagine my surprise when I glanced at the screen last night and my 15 year old had built what looked like a quilt. He wasn't thrilled with me calling it that, but what I saw was definitely quilt-worthy. Take a peek....
I'm going to copy this design over into my EQ7 software and see if I have enough fabric to pull this off. I hope so, because it is just perfect. My 12 year old son wants to help, too, so I'll probably use this as a way to really teach him machine piecing. Should be very straightforward assembly, so perfect for my beginner.
Eventually the 15 year old will get over the horror of seeing his Minecraft "spleef arena" (a strange kind of fighting the players can do in the game) turned into a quilt. I hope.
I might have stumbled onto the project, and it came from the most unlikely of places: another video game.
Now, this video game is a computer based free-build sort of game. The player has a supply of digital blocks with which he (or she) can build pretty much anything he wants; my boys call it "Legos for the Computer". If you have kids in your life, you may have heard of it --- Minecraft. It's a fantastic way for kids to be creative.
Well, imagine my surprise when I glanced at the screen last night and my 15 year old had built what looked like a quilt. He wasn't thrilled with me calling it that, but what I saw was definitely quilt-worthy. Take a peek....
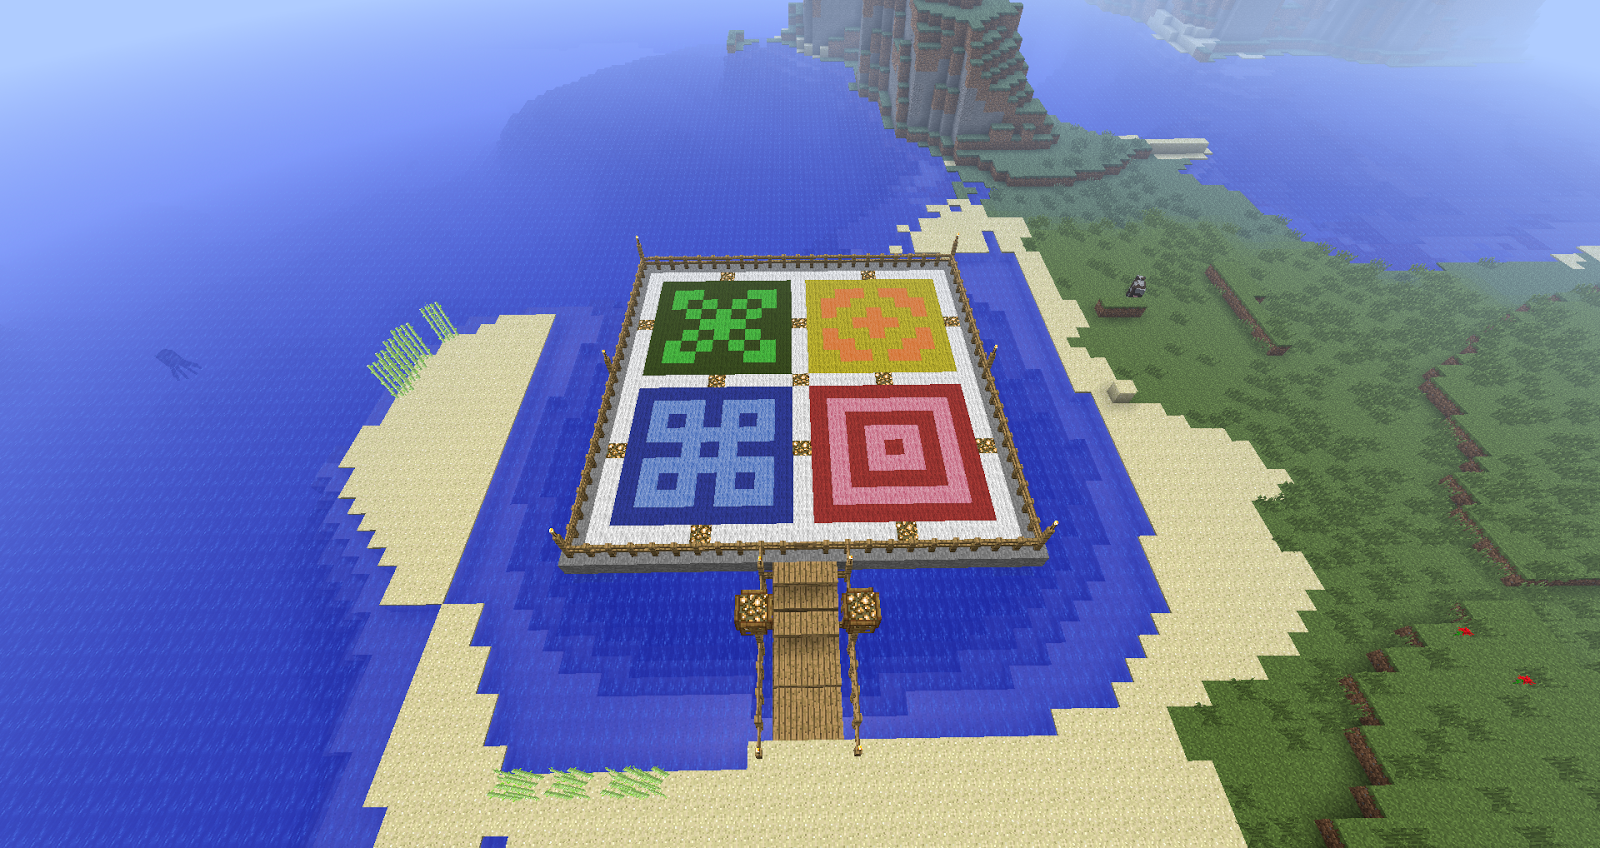 |
| imagine just that square platform, as a quilt made of 4 oversized blocks.... |
I'm going to copy this design over into my EQ7 software and see if I have enough fabric to pull this off. I hope so, because it is just perfect. My 12 year old son wants to help, too, so I'll probably use this as a way to really teach him machine piecing. Should be very straightforward assembly, so perfect for my beginner.
Eventually the 15 year old will get over the horror of seeing his Minecraft "spleef arena" (a strange kind of fighting the players can do in the game) turned into a quilt. I hope.
Tuesday, June 11, 2013
which binding?
Narrowed it down to these two, which should it be?
 |
| map fabric in tan really sets off the piece/pops against it |
 |
| sunset fabric blends well up top, not as much against the hills |
 |
| view (sort of) with both....left or right, left or right..? still trying to decide |
Monday, June 10, 2013
....and finished it!
Wow, this was fun!!
I took a few days off between the buildings and the rest, but when I sat down to do the rest -- none of which involved those time-consuming pivots! -- I just kept on going until the whole thing was quilted. Wow! I think I might need more small projects in my future; it is so very rewarding to actually do the quilting I envision instead of what I settle on because I can't manage a bed quilt through my little machine, and to finish without stiff shoulders and a sore neck!
With the buildings and street done, I moved right to the hills/rain forest portion. I debated thread color for a while, and decided I wanted to emphasize the "city cutting through the rain forest" aspect so stuck with the gray thread. I quilted simple contour lines, following the curves of the hills with a simple straight stitch.
Then I moved on to the little bit of sand in the lower left corner; I did a simple diagonal cross hatch over that little piece, just to give it a different texture from the rest. For the ocean, I played with decorative stitches on a piece of spare fabric until I found the look I wanted. I have a super basic machine, so not many stitches to play with, and I don't know what this one is called (it's "J" on my machine...) but I liked that it looked like waves, without me having to do free motion quilting of waves.
I used a dark blue 30 wt. thread for this part and then with my walking foot just followed the shore, overlapping the top row a bit as well as overlapping the sand to mimic how water laps the shore in real life. The decorative stitch did all the work for me, and I am thrilled with how it turned out. yay!
For the sky I switched thread again, to a varigated blue to white King Tut thread. Back to a straight stitch, and still with the walking foot, but I quilted in gentle curvy lines to give a more organic, windy, breezy kind of feel....air currents rarely go in straight lines, after all. I skipped over some buildings, curved around the tops of others and just had fun with the free flowing aspect of it; sometimes I crossed lines I'd already quilted, sometimes I drew really near, sometimes I moved far far away, just quilted as it felt right.
None of the quilting lines, for any of this, were marked at all, except that on the buildings I did mark one single line to indicate did I want the lines going horizontal, vertical, diagonal, etc. For the rest of this I just followed the outside edge of the part being quilted, and then followed the sewn lines; for the sky I just improv'ed the whole thing.
Now it waits for binding....not sure yet what fabric I want to use for that, so I'm working on my next bed quilt while I mull over my options for finishing this project.
I took a few days off between the buildings and the rest, but when I sat down to do the rest -- none of which involved those time-consuming pivots! -- I just kept on going until the whole thing was quilted. Wow! I think I might need more small projects in my future; it is so very rewarding to actually do the quilting I envision instead of what I settle on because I can't manage a bed quilt through my little machine, and to finish without stiff shoulders and a sore neck!
With the buildings and street done, I moved right to the hills/rain forest portion. I debated thread color for a while, and decided I wanted to emphasize the "city cutting through the rain forest" aspect so stuck with the gray thread. I quilted simple contour lines, following the curves of the hills with a simple straight stitch.
 |
| hills are quilted |
 |
| and now the waves are done |
For the sky I switched thread again, to a varigated blue to white King Tut thread. Back to a straight stitch, and still with the walking foot, but I quilted in gentle curvy lines to give a more organic, windy, breezy kind of feel....air currents rarely go in straight lines, after all. I skipped over some buildings, curved around the tops of others and just had fun with the free flowing aspect of it; sometimes I crossed lines I'd already quilted, sometimes I drew really near, sometimes I moved far far away, just quilted as it felt right.
 |
| wavy air currents across the sky |
 |
| finished! well, waiting on binding.... also -- should the SP "pop" just a little more....hmmmm. |
Thursday, June 6, 2013
Started the Quilting!
I knew for this challenge project I wanted to stretch myself, so I decided to do custom quilting, which I've never done. On a home machine, and being a newbie at this (I've owned my machine less than a year, folks!), I've only so far done straight line quilting with just a teeny tiny little bit of custom touches on two projects. As most of my projects are big (bed sized), it's *hard* to wrestle a quilt through a home machine with the precision needed for custom stuff. The small size of this challenge quilt -- perfect!
I started with the buildings, and did a mix of vertical lines, horizontal lines and diagonal lines, so that the buildings touching each other all have lines going different directions. This way it helps separate the different buildings, although I also did a tight zig zag down the edges or outline of each building, as well.
I also went ahead and did a zig zag in the street section, just straight across following the edges of the street. I skipped over the SP to enhance the trapunto, and left the SP unquilted so that it really pops.
I did this all with the walking foot and a regular straight stitch, and all with pivoting, so that it is one continuous line of quilting from the left edge to the right, back and forth, up and down, side to side, marching on until it gets to the far edge. It was a LOT of pivoting, but so worth it! I love how the buildings turned out!
Look, it even looks nice on the back! First time I've ever used a backing fabric + thread combo that lets the quilting show up on the back. Gulp! Scary stuff, that, but since it's a wall hanging I didn't worry about it and just did what I wanted. It turned out lovely, though, so I'm extra happy! Very proud of myself for stretching this far. Now on to the hills and background....
I started with the buildings, and did a mix of vertical lines, horizontal lines and diagonal lines, so that the buildings touching each other all have lines going different directions. This way it helps separate the different buildings, although I also did a tight zig zag down the edges or outline of each building, as well.
 |
| notice on these buildings -- diagonal, vertical, opposite diagonal (following the edge of the slanty line up top on that building), horizontal, vertical, and so on.. |
 |
| I lined up the edge of the walking foot with the line I wanted to follow. When I reached the edge of the building, I would stop with the needle in the fabric, raise the foot, pivot the fabric, take 2 or 3 stitches down the edge (going over the zig zag) and then pivot again, line up the foot against the line just sewn, sew back in the opposite direction, repeat ad nauseum until all the buildings were quilted in this manner. |
 |
| front (in progress) and back I love that I can look at the back and tell where the buildings are! |
Subscribe to:
Posts (Atom)