Showing posts with label Christmas. Show all posts

Monday, December 17, 2012

Ready for Christmas!! (tree skirt is done!)

It's done, it's done!!!

Finally this weekend I had time to sit down and finish putting the binding together and get it on the tree skirt. I had to sew lots of long strips of green fabric together in order to make one really super long strip, then cut the slit & circle in the tree skirt so it would fit around the tree, then sew the really super long strip to all the outside edges (and the edges of the slit and around the circle in the middle). Whew!  But, I got up early on Sunday and finished it while everyone slept. Took me about an hour, including making the ties and putting those on. That circle was a little difficult!!

finished! 
Since this is just a tree skirt, I did cheat and just pin/clip it in place and sew one time by machine. None of that "sew onto the front, then fold and fold again so it wraps around, then hand sew with invisible stitches on the back so it doesn't show up at all...." stuff. Not for something that will only ever live on the floor below the tree, covered in presents.  I am just not that into the finishing details, and the little stitches that show on the binding (that wrapped edge) don't bother me anyway. If I ever want to enter a quilt into a quilt show, I'm in trouble....

While I was making the tree skirt, it reached a size I felt was good so I decided to skip adding the called-for borders. Seeing it under the tree, with plenty of room for gifts and all but not sticking out far enough that we are stepping on it, I'm glad I made that call. That's what freed up extra fabric for the stockings, too, so definitely a win-win.
in place under the tree....(lights are turned off)
(the kids decorate the tree.....)

And, bonus -- this is the same pattern as Dad & Kim's tree skirt (which she made several years ago) and was a gift from them, so every time I pull this out in years to come, I'll have a sweet reminder of some very special people in my life. Thanks again, you guys!! I absolutely love it!!


plenty big enough for gifts without 4" more on every side!


Monday, December 10, 2012

The Stockings are hung....

I did it! I made homemade stockings for us this year!! I've wanted to do this for some time, since I first started sewing by hand. Actually, before that, when my sister made awesome stockings for her family using recycled (or upcycled, I should say...) men's dress shirts. Oh my word, those were darling!!! I don't have a picture, but trust me --- a more gorgeous, sweet, vintage-feel Christmas stocking you have never seen. -sigh-

Alas, at the time, I had zero sewing skills, and she and I lived too far apart for it to be practical of me to demand she make stockings for us, too. Drat those miles!!! But, inspired it left me, and now I've done it! And these say "our family" so much more even than my sister's adorable stockings would have (though her version says "her family" perfectly...).

It all started with a tree skirt, actually. A gorgeous fabric for the back of the tree skirt, to be precise. A fabric I couldn't bear to waste on something that would never see anything but the floor. So I decided it had to be in stockings, too. I left the borders off the tree skirt, and then gave the boys a choice of fabric (gulp!) and so I had enough. I now have enough left over to make a table runner or Christmas place mats or something, too. Woot!!

front of the tree skirt;
I still need to make and apply the binding...(and cut the center hole)


Isn't this fabric beautiful?!

the back
isn't that just way too pretty to only ever see the floor????


The stockings came about slowly. I let each boy choose what I would applique to the front of the stocking. I wasn't planning to let them choose their fabric, but one boy just matter-of-factly asked for a specific fabric and I couldn't say no. I had several scraps (all from the tree skirt, so they all coordinate nicely) and one blue Christmas fat quarter I bought a while ago. The blue doesn't coordinate as perfectly, but it works. So I set about taking orders.

The Artist was most definite about what he wanted --- a present on the front. A blue present, with a white ribbon. And a cat popping out. And the cuff should be candy cane striped. No problem, right? Right. Or, well, it wasn't easy, and it took forever, but I did it, because how could I not?

The stripes, by the way, are made from half-square triangle scraps left over from the tree skirt cutting. I joined the triangles into squares, then carefully arranged them to make the diagonal stripes. Then added more when I realized that the rows shrank (darn seam allowances!). He loves it, that's all that matters.

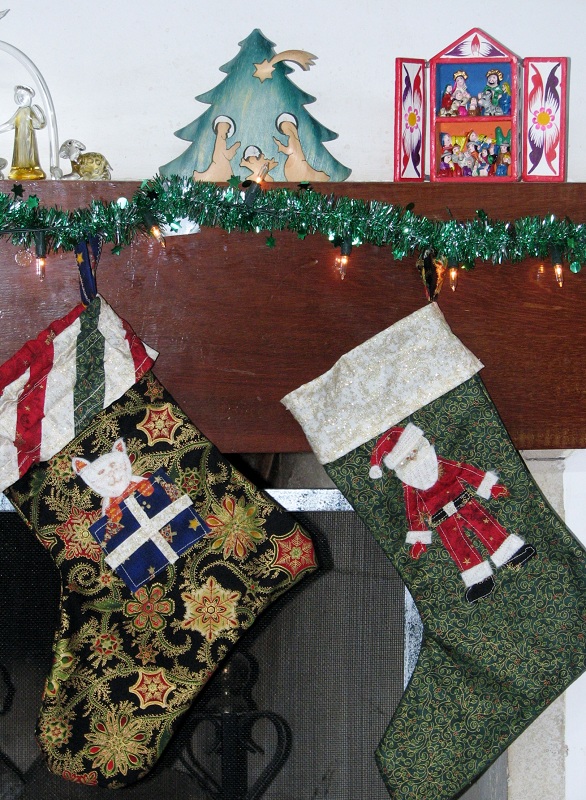
the Artist's cat stocking
and The Adventurer's santa stocking

The Adventurer was set on one thing and one thing only; Santa Claus. Oye. Not complicated at all, dear, no. Sure I can applique a Santa for you! Totally!! Oye. I am so glad that over on The Quilt Show forums they mentioned using washable glue stick to hold down seams, applique, etc. Lifesaver!! I cut and glued all the pieces and then just did a raw-edge applique with the machine. Whew! Felt for the cuffs and beard and such.

The Writer wanted a cross, to show the real meaning of Christmas. Yes, normally symbolized by a manger at this time of year, but the message is the same. Easy, and not bad looking, I hope. Whew!

Mr. Snowman and The Writer's cross


The Chemist really had no preference except he wanted the blue fabric. Of course. I came up with the idea to do a Mr. and Mrs. Snowman on his and mine, used the gorgeous fabric for each of our cuffs, and used some of the red for mine since no one else had picked red yet. By the time I got to mine, I finally had down exactly how to attach those darn cuffs! I really should have found a good pattern to use.....


The nativities that line the mantel come from around Brazil. I've decided I'm collecting them. It started with the plain white one, which was a gift from my mom one year ages ago. Then here the first one I added was the tree with the manger scene inside it; that's by the same artist who did the world tree that heads up the blog. Love his stuff. Love the juxtaposition of a secular symbol and a Christian symbol. Sweet! The next I got was the little 2 story one with doors that open; that came from the local craft fair.  Then I added the colorful clay one with the flying doves overhead (anyone know why the doves???) which came from an art gallery in Paraty.  After that I got the glass one at a nearby city that specializes in blown glass, and the 2 little tiny ones on the end are from our US trip this summer, from the Mt. Rushmore area. I still want to return to Natal and add one from there, although we mostly saw sets of the 3 wise men there. I didn't snag one on our first trip up there.....

nativities and mantel
and the tree, waiting for the tree skirt....

How do you decorate for Christmas? 

Friday, December 3, 2010

Triumph!!! The Sewing Project is Almost Done!

Today, even though the recipient reads this, I'm posting a picture of my sewing triumph.

I'm extremely proud. Seriously, beyond measure, over-the-top PROUD. This was a hard project. Four parts, the first two relatively easy. The third part, because I didn't know enough to do it by myself, was horribly difficult. I shared that saga earlier. The fourth part, though, everyone told me to to avoid.

bits and pieces of Part Four
My mentor said to skip it. The Chemist said to skip it. Everyone I talked to said "It's hard. Skip it." Kim said "Bring it with you, I'll help. You can use my machine."

But, well, The Adventurer didn't just pick up being stubborn from nowhere. My genes are partly responsible. And so I said, "Nope. I'm going to try it."  And, my mentor, being the very good friend that she is, told me what I needed to know in order to attempt Part Four.
"Draw your sewing line, and then don't sew past that when you make the angles/corners." 
"Cut out the pattern on the sewing line, and eyeball your 1/4" seam allowance, so that your sewing line is accurate." 
"Here's the measurements in case the scan didn't come through at 100% size." 

Putting it Together

She was also horrified to know that "whoever got (me) started didn't tell (me) about not sewing past the seam allowance...." -- until I reminded her that No One got me started.  I mean, she inspired me. Another dear friend pushed me a little. My mom took me shopping. But no one sat down with me and said, "Now, when you piece a quilt block, make sure you......."  Nope. I was on my own for that, and this has been a huge learning experience for me. Trial by fire, ya know?

So, having learned all I needed to after Part Three, I decided I really could tackle Part Four. And when my mentor saw the pictures from Part Three, she finally gave me the last bit of info I needed; I took that as a vote of confidence and today I dove right in.

Part Four 
And a short (ummm, 3 hours?) while later, I was done. On my first try. With the ridiculously hard Part Four that everyone said I shouldn't try. But which I totally rocked. On my first try. So, yea, I'm a little proud.

All Four Parts. Pardon the Size Discrepencies;
 that will be fixed when it hits Finished Product level.
I hope. 
Not too bad for a beginner without a sewing machine, huh? I sure hope the intended recipient likes the finished product.  I plan to put all the finishing touches this weekend. Wish me luck!

Wednesday, November 10, 2010

Getting Ready for Christmas

I have been so busy! I'm working on Christmas gifts and finding myself under deadlines I didn't know or anticipate having.

Every year I make an annual photo memory book for us to keep. I use Picaboo X - if you're looking for an easy, professional quality photo book program, this is the one you want. It's a free download, you work on your computer, not on-line, and the flexibility is amazing. There are thousands of very scrapbooky backgrounds available, too, as well as simple stuff that doesn't look froo froo at all.

Every year, usually in the weeks before Christmas, they offer a Buy One Book, Get One Free coupon. Normally this is Buy a Large Book, get a Medium Book (of the same book; you don't get to then make a 2nd, different book) Free.

Well, this year, expiring Monday, November 15th, they are offering Buy 1 Get 1 -- same size copy. Same size, people. So now the recipient of the free copy gets a large instead of medium.

AND -- even better! -- they just started offering Calendars! So that's on the list, too, and under the same Buy 1, Get 1 offer, only until Monday. So suddenly, the projects I was working on and planning to finish next month all have to be finished right now. -Gulp-

The good news is, I'm done with the first calendar (except for waiting on pics from my sis-in-law.....). The second calendar will only take me 30 minutes or so, as I'd already done it over on Kodak Gallery so all I need to do is more or less transfer that over.  And The Book is almost done. One last day of work should do it. I hope.

Which will finally give me time to work on the sewing project I've got going. Someone is getting a set of pieced, quilted coasters/hot pads. If I manage to figure it out and get them done. they're proving harder than I thought they would be, which stinks, 'cause I was hoping to get more than one set done. That's looking less and less likely. We'll see. Maybe I'll get some good sewing time in this weekend - it's another 3-day weekend coming up, and we're just going to stay home and relax. So, maybe.

In any case, all of this explains why I have been, and am likely to be, absent from the blog the past few (and coming) days. Christmas gifts can't wait, not when I'm on a deadline.

What projects do you have going on at your place? Have you started Christmas preparations yet? I'd love to hear about what that looks like at your house.....